

✍️ 本文更新時間:2026 年 May 13 日
I get asked by so many future students (?) every day about Heptabase Heptabase usage tips and tutorials. Since I'm a documentation enthusiast who records even the funniest jokes haha,
whenever someone asks me a Heptabase question and I find it helpful, I record it in Heptabase's Journal (which I use as an inspiration notes section). After accumulating 45 tips, I decided to write this comprehensive lazy guide, so the knowledge can flow and be shared with all the KnowledgeGut fans who need it.
This article is for people who already subscribe to Heptabase—both veterans and beginners welcome. Lots of uses you probably haven't thought of! KnowledgeGut fans who haven't subscribed yet can click the button below to sign up and get a free 7-day trial right away (or get a free 30-day trial by purchasing myInput & Output Course, which gives you $11.99 credit toward your subscription).
If you want to learn more about what this productivity Notes app can do, check out the article below to discover all the different ways you can use it—you'll definitely be amazed! 🎁
✦ Heptabase 10 Must-Learn Use Cases: From Project Management to Travel Planning to Solo Business—Everything Revealed Where can I find Chinese customer support? How can I get a complete answer from support quickly? Generate Podcast Transcripts and Summaries for Free with Built-in AI, Beating All Note-Taking Software
Update Log
• 2024/10/14 #26 Red-Green-Blue Traffic Light Status Added • 2024/12/26 Updated image text inconsistencies and English typos • 2025/02/12 Added interface overview to help beginners get started faster • 2025/03/08 Input & Output Paid CourseTo reach more people, embedded recommendations within articles • 2026/05/13 文章開頭新增「Heptabase 是什麼?這 45 個技巧適合誰用?」入門段,讓新手讀者一進來就知道適不適合自己📌 Must Read Before Reading📌 Before Reading This Comprehensive Heptabase Tutorial, Please Note These Six Things
- Click on Images to Zoom In
Since this is my first time writing a feature tutorial, the text inside the article images in the upper half is quite small. You'll need to manually click on the images to zoom in for better visibility of the text within the images!
- Feel free to skip around this article
Because there's so much content, and some features you're too lazy to keep up with the official updates on, whereas I follow the official updates every day, I can share with you the features I discover.
- For usage you haven't seen before, you must click the table of contents and jump to those sections
Some of the usage examples are small details I actively discovered, and they're the most commonly overlooked features. I'm not covering all the most basic and detailed features—it would take three days and nights to explain them all XD. I'll only share those commonly overlooked tips, and if you master them, they'll definitely boost your productivity.
- While watching, you can think about how to apply these beyond Xiaochang's usage examples for your own use cases
All the use cases I screenshot and share are based on my carefully reviewed needs and tailored for Xiaochang's personal use. Beyond applying my methods to your own Heptabase, remember to spend some time thinking about how to optimize this approach for 'your use context' to truly grasp the essence of Heptabase Notes.
- This article primarily provides desktop version tutorials
The mobile and tablet versions have many features this article can't help with. Remember to use the desktop or web version! For now, I mainly use the Journal feature on mobile, but I'll continue recording mobile features for you in the future. Feel free to leave a comment below or go to IG ask.
- Text Style Guide for This Article
Text highlighted with gray highlighter = features you click with your mouse in Heptabase
Red text with red background highlighting = keyboard shortcuts. On Mac, replace Ctrl with Command (or Cmd) key ⌘!
All the shortcuts mentioned are ones I regularly use. I'm leaving out rarely used ones for now, so I'll teach keyboard shortcuts for some features and mouse clicks for others. I'll create a full shortcut list to share with you later ~!
⭐ Let's Get Started ⭐
Heptabase 是什麼?這 45 個技巧適合誰用?
Heptabase 是一款以「白板+卡片」為核心架構的數位筆記軟體,讓使用者把資訊拆成最小顆粒的卡片,再透過視覺化白板進行連結與思考。這篇 15,000 字的完整教學涵蓋介面操作、卡片技巧、心智圖、快捷鍵、PDF 標註、模板、分享等 45 個實用功能。
適合誰看:
- Heptabase 新手(前 20 個技巧)
- 用了一段時間想精進效率的中階用戶(21-35)
- 進階用戶想看冷門功能(36-45)
Software Interface
Beginners must understand this interface layout first to understand the rest of the content!
Overall Interface Overview
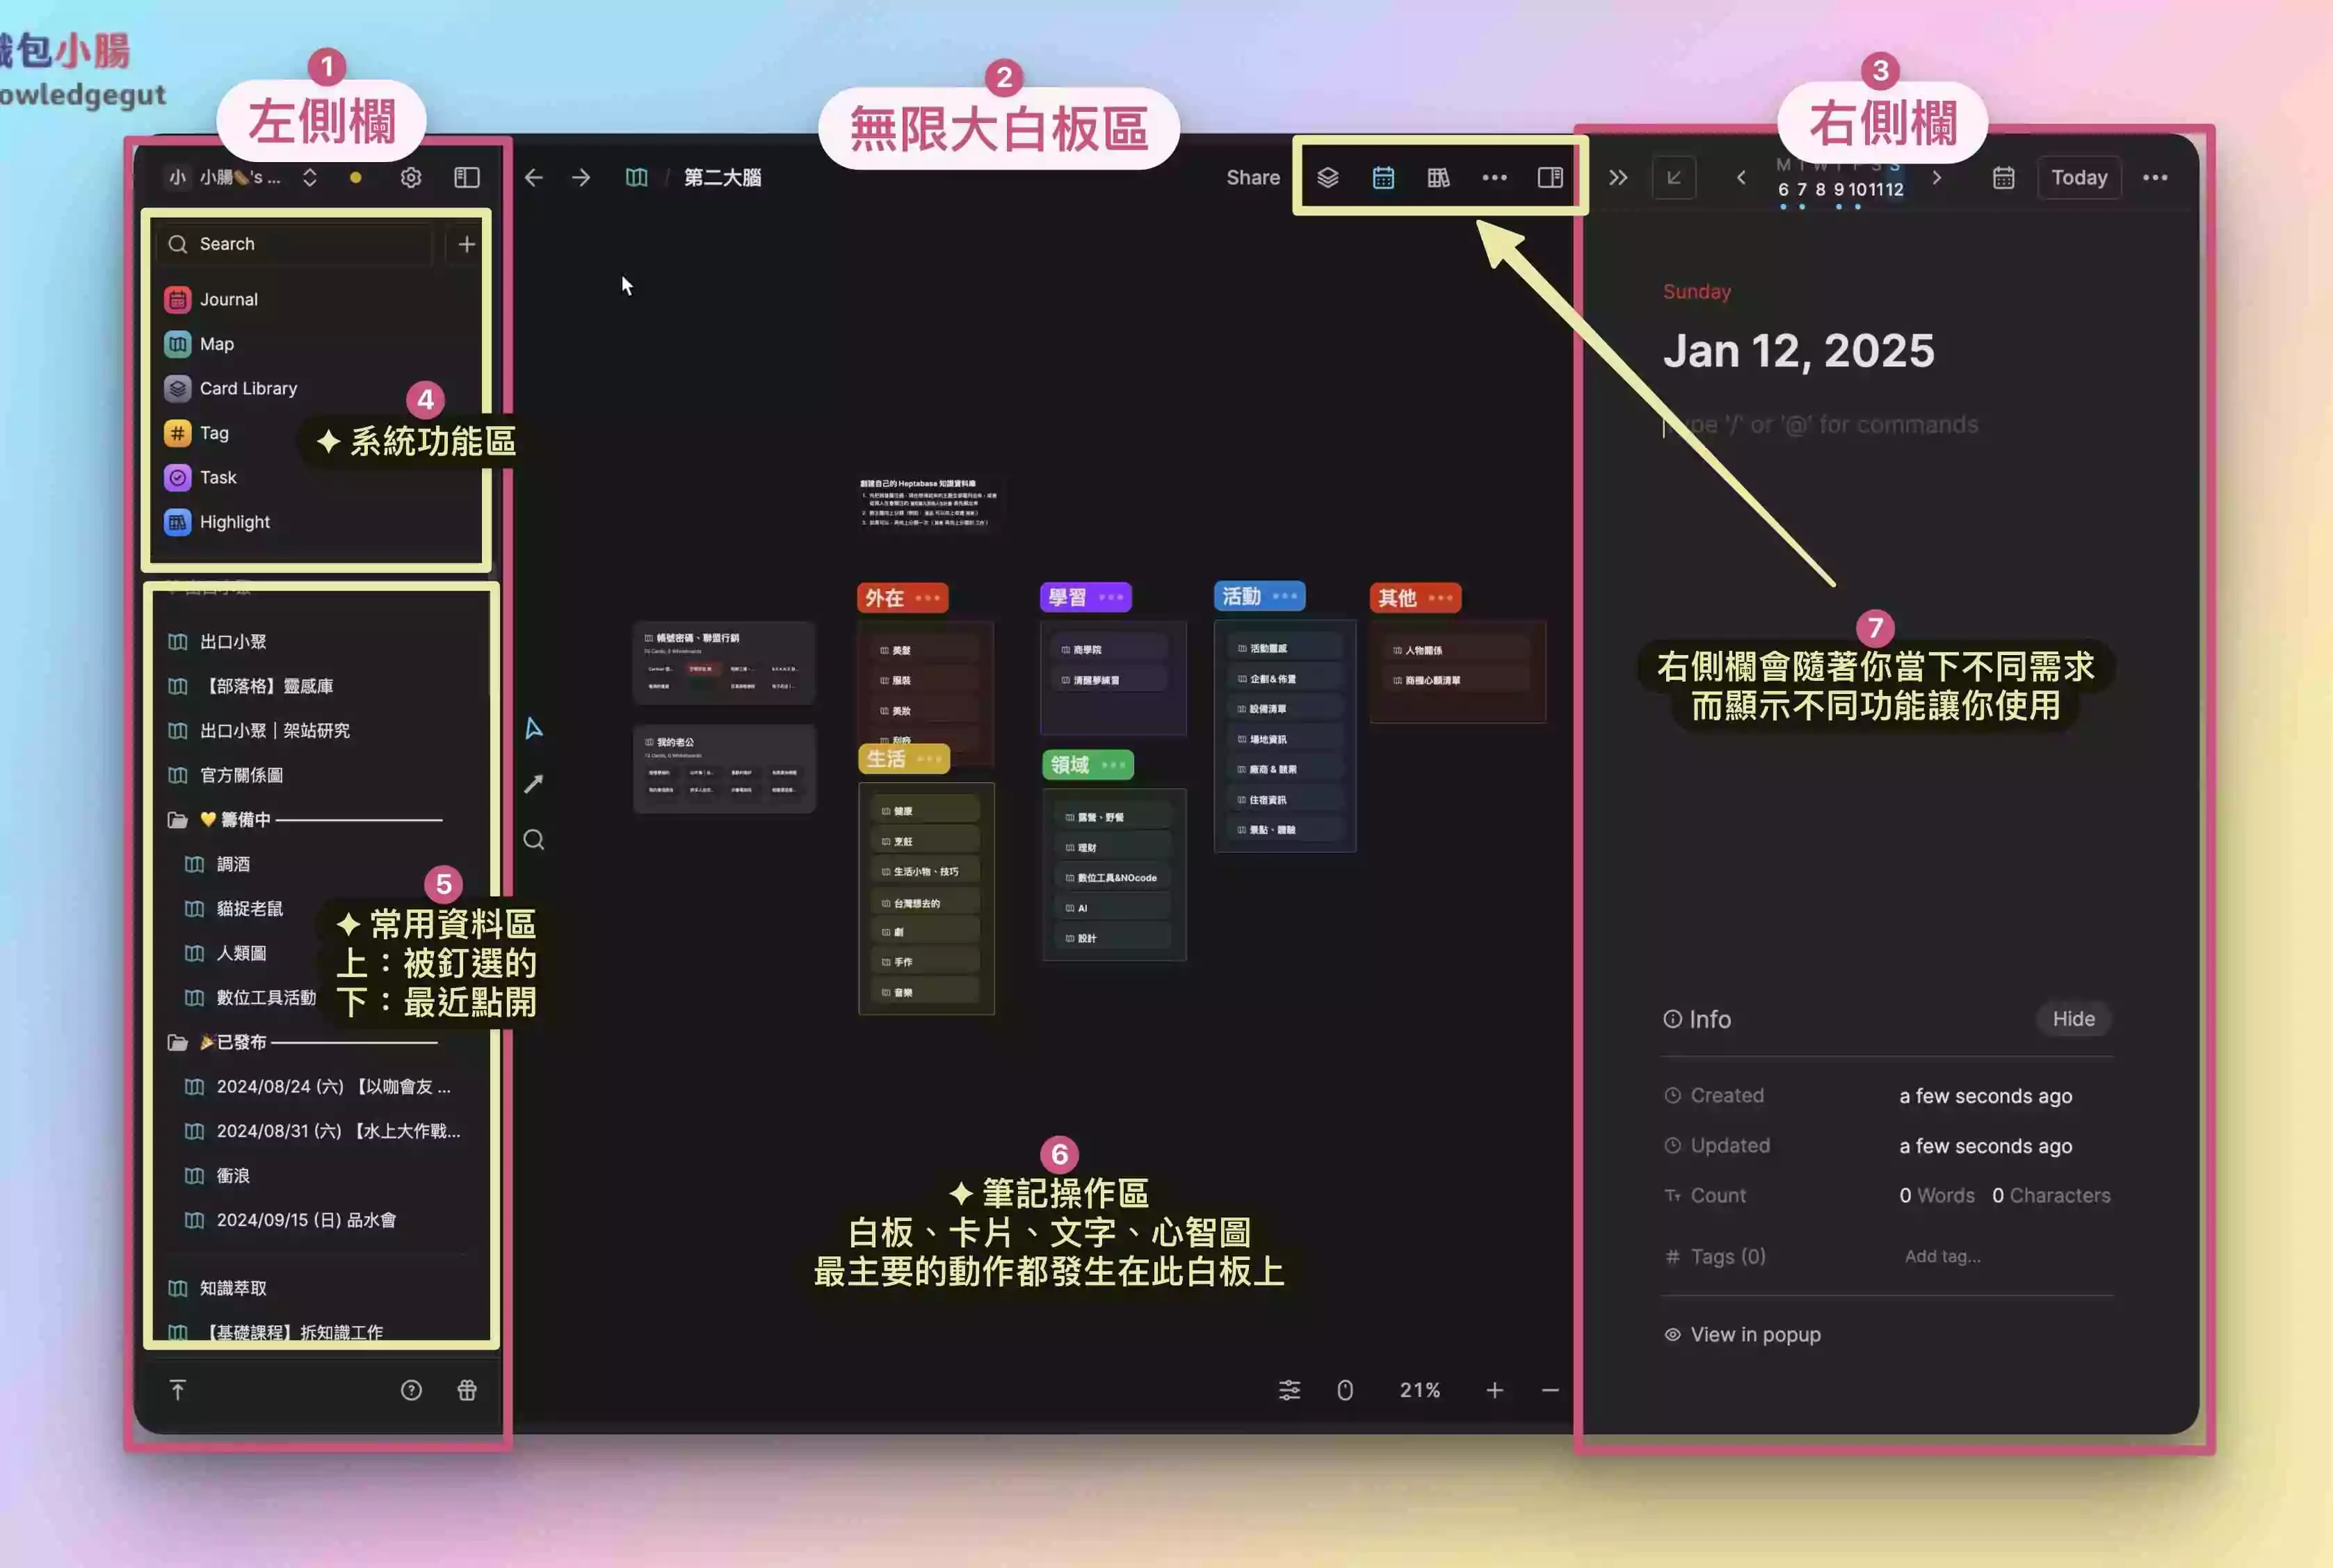
- Left Sidebar
General Function Area—includes items 4 and 5 in the image. The overall structure doesn't change based on context. - Infinite Whiteboard Area
As shown by item 6 in the image, this is where all your note-taking and thinking happens. You can freely zoom and pan the whiteboard. - Right Sidebar (Scrollable)
Contextual Function Area—clicking any icon in item 7 changes what displays in the right sidebar, which adapts based on context. - System Function Area
Heptabase has organized several major sections for navigation, plus a search box to find various data. - Frequent Items Area (Scrollable)
My Favorites (pinned whiteboards or other content) and recently accessed items.
Card
#01 Seven Types of Cards
I've screenshotted all seven types of cards for you. Use these images to observe what's different and similar between them. Cards are one of the most fundamental features you need to know in Heptabase. Please study this section carefully.

- Type 1:Regular Card
The original default card type that can contain any type of data!


(Image source from Attack on Titan anime)
The General Card is the most common and fundamental feature you need to know. You can place any data inside and freely adjust text styles and formatting. From the perspective of card box note-taking logic, this General Card is where you store the smallest-granularity knowledge points.

- Second Type: PDF Document Card
The image shows how I placed a PDF presentation file from my lecture in Heptabase, displayed as a document card format.

- Third Type: Date Card
The image shows the inspirational notes I recorded on 2023/11/04. This data only appears on that day's date card, and a new date card is generated every day.

- Fourth Type: Highlight Card
By using the highlight and marking functions on PDFs within Heptabase, you can crop or highlight key points to create a Highlight Card.

- Fifth Type: Video Card
One video = One card. You cannot add text or other elements to it!

- Sixth Type: Image Card
One image = One card. You cannot add text or other elements to it!

- Seventh Type: Audio Card
One audio file = One card. You cannot add text or other elements to it!
- If you want to add text to a 'Video Card', 'Image Card', or 'Audio Card', create a 'General Card' and drag the video, image, or audio into it. This will turn it into a 'General Card with media files' rather than a Video, Image, or Audio Card.
- All these card formats can be clicked toCtrl+TGive these cards a Tag!
🎁 Thank you for reading this far! I've prepared free resources for you ⬇

I'm giving you the 《Heptabase 13 Application Scenarios Inspiration Pack: Break Your Imagination!》 worth over $899~
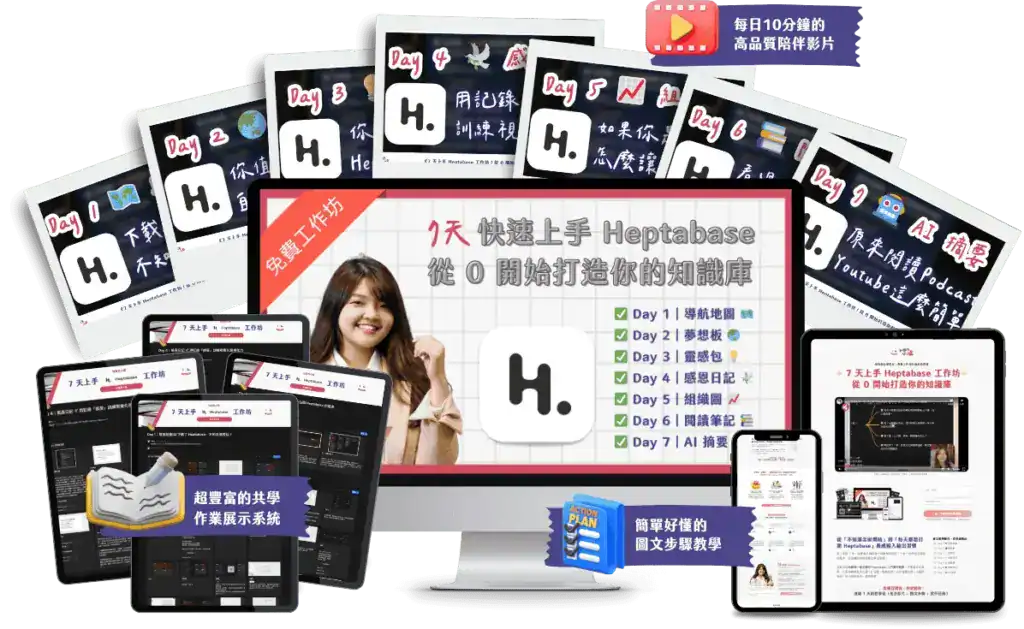
《7-Day Heptabase Workshop! Build Your Knowledge Management System from Scratch》
This is a free online course I spent an entire month creating. Simply complete the 7-day workshop and follow the steps to finish assignments, and you'll completely transform your note-taking method and build your own Second Brain!
I'll guide you hand-in-hand (videos + text) to complete daily tasks:
- ✅ Day 1 Navigation Map
- ✅ Day 2 Dream Board
- ✅ Day 3 Inspiration Pack
- ✅ Day 4 Gratitude Journal
- ✅ Day 5 Organization Chart
- ✅ Day 6 Reading Notes
- ✅ Day 7 AI Summary
#02 Truly Delete Cards on the Whiteboard
I often accidentally click to create a new card (double-clicking the mouse creates one), and a common deletion method is to select the card directly and then press the keyboard '← Backspace' to delete the card, but later I discovered that the deleted card still exists in the Card Library!
To permanently remove cards you're not using, I found that by following the steps below, you can truly delete those cards from your Heptabase card library within the whiteboard.
Step 1
Select a card (box selection / direct click), and it will show a blue border indicating it's selected
Step 2
Right-click with the mouse, or click the three dots in the top right
Step 3
Click to delete this card from the card library Delete from card library, and it will truly be deleted from your card library!
Even if you truly delete a card and can't find it in the card library, you can still recover it if needed! You can check the 'Trash' section in the Heptabase logo at the top left to view accidentally deleted cards. See the detailed steps in theTrash section tutorial。
#03 One-Click Delete Blank Cards
The benefit of clearing blank cards is that when you open the card library Card Library , the overall view is cleaner and lighter, just like unused items at home that need decluttering.
Step 1
Click to open the left sidebar Card Library
Step 2
Select Delete empty cards(Broom icon)
Step 3
Blank cards and 'A wonderful new card' all disappear, YA~
#04 Copy Cards: Non-synced Cards and Synced Cards
You can also press the keyboard Ctrl+C to copy the card.
Unsync Dismiss:
The original card & duplicated card can be freely edited with their own information without syncing.
Sync Sync pasted card:
The original card & duplicated card will have their content synced.
Step 1
In the card you want to copy, right-click and press Copy
Step 2
At the place where you want to place the card, right-click Paste, or directly press the keyboard Ctrl+V to paste the card
Step 3
Choose Unsync card Dismiss, or Sync card Sync pasted card
- Choose Unsync card Dismiss
You'll discover that the duplicated card has no relation to the original card, can be freely written separately, and becomes a regular card again!

- Choose Sync card Sync pasted card
You'll find that the actions of both cards are identical, and when the two cards are on different whiteboards, the top right corner of the card will show which whiteboards this card appears in.
#05 Copy Card Link: Internal Cards, External Cards, Header Links, Card Links
The copying I mentioned in the previous section was about 'Copy Card' which has sync & unsync, and this section will share with you that 'Copy Card Link' has four different ways to play.

Type 1:Nested card Paste as embed
Step 1
In the card you want to copy, right-click and press Copy link
Step 2
In 'other cards',Ctrl + V paste link (At this point, you can't find the paste button in the right-click menu, so use the keyboard)
Step 3
Select Paste as embed , it becomes a nested card (card within card)The card appears inside the card , becoming a nested card.
And the 'inner card' of will sync with the 'original card'!

You can edit text in inner cards; however, when you do, the original card will also be updated simultaneously.
The second type:Outer card Paste as embed
The principle of outer cards is 'embedding the original card within a text box (text element)', which is more complex. If you don't have a specific need for it, you can just review it! I rarely use this feature myself.
Step 1
In the card you want to copy, right-click and press Copy linkStep 2
Click on an empty area of the 'whiteboard' Ctrl + V paste link (At this point, you can't find the paste button in the right-click menu, so use the keyboard)Step 3
Select Paste as embed , and it will become an outer card
If in the second step you paste on the 'whiteboard' instead of 'inside a card', it becomes an outer card. You can imagineouter card = an image, where you cannot modify text content or text styling. So when deleting, you can only delete the entire outer card; you cannot delete individual text within the outer card.
The third type:Title link Paste as mention
Step 1
In the card you want to copy, right-click and press Copy linkStep 2
Click on any location Ctrl + V paste link (At this point, you can't find the paste button in the right-click menu, so use the keyboard)Step 3
Select Paste as mention, and it becomes a title link!After clicking the title link, you'll be redirected to the original card's location. This function has the same effect as directly mentioning @the card's name! For detailed steps, see the Mention section's tutorial。
-1.png-1.png)
The fourth type:Dismiss card link
Step 1
In the card you want to copy, right-click and press Copy linkStep 2
Click on any location Ctrl + V paste link (At this point, you can't find the paste button in the right-click menu, so use the keyboard)Step 3
Select Dismiss , which becomes a simple link, shown as '4' in the imageClicking this link will directly jump to that card link's location

There's a neat trick with the last card link! You can copy a card link and paste it onto text to use as a hyperlink. Clicking it will jump to that card. This is often used when you don't want to Mention cards with long text.
#06 Auto-expand Cards vs. Scroll Cards

- The card shown as '1' in the image
No matter how much text you type, the card will automatically expand 'downward' without any concern about content being hidden. It will also push other objects aside as it grows automatically.
- The card shown as '2' in the image
When you hover your mouse on the card's edge (cursor becomes a double arrow) and drag to resize the card, it loses its auto-expand function because you've manually 'preset your desired size'. However, a scroll function is added so you can scroll up and down to show the parts you want to see.
To change a card from the right (non-expandable) back to the left (auto-expandable), simply right-click the card and select fit to content, and it will change back to a left-side card.
Mindmap
#07 Mindmap Collapse Feature
Let me use my presentation content from the WordPress Meetup on 2024/04/22 (Monday) as an example! Mind maps can be collapsed, so you can temporarily hide parts you don't want to see.
Step 1
Right-click on the whiteboard (or on a card) and select Mind Map Mindmap
Step 2
Create Your Own Mind Map DataThis mind map content usesMind Map Linked Cardstechniques

Step 3
Right-click on text or card nodes and select Collapse Cards >< Fold node
If you want to open layer by layer, start by collapsing from the outermost layer and work inward. When opening, it will also expand layer by layer. Perfect for 'presentations' and 'sharing sessions'—I've used this method for meetings and lectures, and it's super convenient!


If you want to expand all data at once, simply click Collapse Cards at the mind map's source point (Image 4) >< Fold node Then you just need to click the arrow once to directly expand all the data behind it.
I really love Heptabase's mind map feature. As a visual learner, I need this kind of expandable information with interconnected effects. In my planned Knowledge Management online course this year (fingers crossed!), I'll teach how to use this feature properly.
#08 Custom Colors for Mindmap Lines
Remember how many users kept requesting this feature? The team finally released it! 🎉🎉
Step 1
Following the same steps, right-click on the whiteboard (or on a card) and select Mind Map MindmapStep 2
Create Your Own Mind Map DataStep 3
Right-click on the 'line segments' in the mind map and select a color

Note that when you change the color, it affects all line segments after that point on the mind map. If you change the source line segment color, the entire mind map's lines will all change color together!
#09 Mindmaps Can Link to Cards
After creating a mind map, drag a card next to it, and a connecting line will appear. Release the mouse to successfully link the card to the mind map.

Here's a pro tip for everyone! If you find it hard to connect regular cards to the mind map, click the down arrow Fold to collapse the card (keeping only the title), then drag it next to the mind map. It becomes much easier to link to the mind map now!

Over 215 students have enrolled, leaving glowing 5-star reviews! The bonuses alone exceed the course value, plus I share exclusive Creator SOP workflows—original content you won't find anywhere else!!

Mention
Note: whiteboard titles can't use this feature! But text and card content can.
#10 Two Ways to Mention
First search method: Type the symbol @ + keyword

Second search method: Type the symbol [[ + keyword

#11 Full-width and Half-width Characters Both Trigger Mention
I'm used to the first method '@' + keyword, but one day I discovered that full-width '@' works too!

However, since it's full-width, remember to press Enter to select the @ symbol first, then use arrow keys to select the mentioned data!
#12 Mention Journal Cards for Specific Dates
Mention can reference cards, whiteboards, and groups, but also dates! I most often use the '@2024/03/20' format to mention Journal entries.

#13 Deleting Characters After Mentioning a Card is Fine
Here's another cool feature I discovered: after mentioning a card, you can make the linked title text as short as you want. As long as one character remains, the link still works.

Important reminder: if you mention the same card twice within a card, the second mention won't link back to the original card. Like in the image above, 'core success factors, not the most' can't be clicked through—only the URL appears.
Advanced concept: If you don't edit the linked title text, changes to the original card's title will sync automatically to the linked title. But if you delete or add text, it becomes a regular hyperlink and won't update in real-time with the original card.
Hot Keys
Here I'm sharing only the keyboard shortcuts I use most. To see all Heptabase keyboard shortcuts, check the official WikiKeyboard Shortcuts Overview, you can also click on the bottom-left corner of the software Keyboard shortcuts。

#14 Search
Search is an essential feature in almost all software, and Heptabase has multiple ways to search. Here are three of them.
Method 1: Search within Current Whiteboard - Ctrl + P
Step 1
Press the keyboard shortcut within the whiteboard you want to search Ctrl + PYou'll notice that the bottom-left corner of the search box displays only your current whiteboard name, exactly matching the whiteboard path name shown above. In this image, the whiteboard name is "2024/04/22 (Mon) Used for Lectures".

Step 2
Type the keyword you want to find in the search boxAfter entering the keyword, the results that appear are all data from the current "2024/04/22 (Mon) Used for Lectures" whiteboard. The left side shows all the searched data, and the right side shows a preview of the data.

Step 3
Click on the data to automatically jump to that data areaIn this case, I clicked on the text data "Create Directly in WordPress Article Editor by Title", so it jumps directly to that, and you can see the abovewhiteboard path remains unchanged。

Method 2: Search Across All Whiteboards - Ctrl + O
Step 1
Press the keyboard shortcut "anywhere" on the whiteboard Ctrl + OYou'll notice the search box is different from Method 1 (Ctrl + P). The bottom-left of the box now shows "Quick find", indicating you've activated the global search feature.

Step 2
Type the keyword you want to find in the search boxHere we search for the keyword "article", the same as in Method 1 above, but you'll notice there's more data because the results are not limited to the current whiteboard—they include all data across your entire Heptabase.

Step 3
Click on the data to automatically jump to that data areaIn this case, I clicked on the whiteboard data "How to Write a Good Blog Post", so it jumps directly to that whiteboard, and you can see the abovewhiteboard path has also changed!!

Method 3: Search within Current Card - Ctrl+F

- Click on the right sidebar icon, which automatically places the card in the right sidebar
- Press Ctrl + Fto open the card's search box
- Enter the keyword you want to search for within the card
- Click on the < or >to see the searched keywords highlighted in orange-yellow


- Click on theexpand card icon to enlarge the card to full screen
- Press Ctrl + Fto open the card's search box
- Enter the keyword you want to search for within the card
- Click on the < or >to see the searched keywords highlighted in orange-yellow


- Click on the Journal icon to open the Journal in the right sidebar. Remember to select the date you want to search for
- Press Ctrl + Fto open the card's search box
- Enter the keyword you want to search for within the card
- Click on the < or >to see the searched keywords highlighted in orange-yellow

- Click on the left sidebar's Journal , open the journal in full screen
- Press Ctrl + Fto open the card's search box
- Enter the keyword you want to search for within the card
- Click on the < or >to see the searched keywords highlighted in orange-yellow

- In the right sidebar, call out the PDF file, press Ctrl + Fto open the card's search box
- Enter the keyword you want to search for within the card
- Click on the < or >to see the searched keywords highlighted in orange-yellow
🎁 Thank you for reading this far! I've prepared free resources for you ⬇
I'm giving you the 《Heptabase 13 Application Scenarios Inspiration Pack: Break Your Imagination!》 worth over $899~
《7-Day Heptabase Workshop! Build Your Knowledge Management System from Scratch》
This is a free online course I spent an entire month creating. Simply complete the 7-day workshop and follow the steps to finish assignments, and you'll completely transform your note-taking method and build your own Second Brain!
I'll guide you hand-in-hand (videos + text) to complete daily tasks:
- ✅ Day 1 Navigation Map
- ✅ Day 2 Dream Board
- ✅ Day 3 Inspiration Pack
- ✅ Day 4 Gratitude Journal
- ✅ Day 5 Organization Chart
- ✅ Day 6 Reading Notes
- ✅ Day 7 AI Summary
#15 Forward and Back
Step 1
On the current Whiteboard A (2024/04/22 (Mon) used during teaching), click the mentioned Whiteboard B ([Blog] Inspiration Pants), you can jump to Whiteboard B
Step 2
After pressing the shortcut key, the screen returns from Whiteboard B back to Whiteboard A- MAC:⌘ + [ or ]
- Windows:Alt + ← or →

Step 3
If you press the shortcut key in the other direction at this time, it will go from Whiteboard A back to Whiteboard BThis feature is perfect for presentations, lectures, and meetings, allowing you to instantly switch screens for the audience to see. I definitely use this feature during presentations! Once you master it, you won't need to search for previous content anymore.
#16 Undo with Ctrl+Shift+Z
Press Ctrl+Z Use this after undo when you want to redo it, because if you press undo twice Ctrl+Z undo, it will go back two steps, so you must learn this feature.
Step 1
Press the keyboard button for the selected data ← Backspace Delete that data entry
Step 2
Press Ctrl+Z Undo will restore that data, returning to Figure 1 with the data
Step 3
At this time, press Ctrl+Shift+Z Redo, and it will return to Figure 2 where it was deleted#17 Section Groups
The grouping feature in Heptabase is one of the essential features! Must learn! Must learn! Must learn!⭐️⭐️⭐️
Step 1
Use your mouse to select the data you want to groupThe data can be any cards, images, text, audio, videos, or even other groups.

Step 2
Press Ctrl+G The selected data has been successfully grouped!
After selection, a black and white three-dot icon will automatically appear in the upper left corner. Click it and then press Create section, which will have the same effect as pressing Ctrl+G the same effect, but using keyboard shortcuts will be much faster.

After grouping data into Sections, you'll notice that when the whiteboard is zoomed out, you only see the Section group names, and all other data becomes tiny!
Right Sidebar
Here I'll share the great things I discovered in the right sidebar XD, but many people overlook them!
#18 Table of Contents
It's a bit like a table of contents in the whiteboard, but it only shows 'Whiteboards' and 'Sections'. The sorting here is based on the absolute distance from the upper left corner.

- Click on the Open the right sidebar Icon
- Click the one at position 2 Table of content Icon
- You can see all whiteboards and groups within the current whiteboard

This is really super useful for bloggers' article management! I directly use it to see which articles in each website category are already complete. I've already given presentations and taught some people about my blog output workflow~ Planning to record a video to share with everyone later.
#19 Whiteboard Info
Everyone knows that card information can be viewed by opening it within the card, but what about whiteboards? This feature lets you see where the current whiteboard you're on has been mentioned.


- Click on the Open the right sidebar Icon
- Click on #2's ! Exclamation mark symbol to open the Info panel
- You can see where your current whiteboard is mentioned
- Click to jump and see the exact location where it's mentioned
🎁 Thank you for reading this far! I've prepared free resources for you ⬇
I'm giving you the 《Heptabase 13 Application Scenarios Inspiration Pack: Break Your Imagination!》 worth over $899~
《7-Day Heptabase Workshop! Build Your Knowledge Management System from Scratch》
This is a free online course I spent an entire month creating. Simply complete the 7-day workshop and follow the steps to finish assignments, and you'll completely transform your note-taking method and build your own Second Brain!
I'll guide you hand-in-hand (videos + text) to complete daily tasks:
- ✅ Day 1 Navigation Map
- ✅ Day 2 Dream Board
- ✅ Day 3 Inspiration Pack
- ✅ Day 4 Gratitude Journal
- ✅ Day 5 Organization Chart
- ✅ Day 6 Reading Notes
- ✅ Day 7 AI Summary
PDF Files
#20 Four PDF Modes
Different modes here refer to the same PDF file that can be displayed and used in different ways within Heptabase.
Type 1: PDF Document Card on Whiteboard
This type of document is a card made from a PDF file. Simply drag the PDF file from your computer into the Heptabase whiteboard.

Type 2: PDF Text File
Simply drag the PDF file from your computer into a regular Heptabase card.

Type 3: PDF File in Right Sidebar
Click on the right sidebar The symbol will automatically place that card in the right sidebar, and the PDF file will appear there automatically.

Note: If you place other cards in the right sidebar as well, you'll notice two cards appear in the sidebar, and the PDF file that was previously scrollable with your mouse wheel can only be < or > paged through instead.

Type 4: PDF File Expanded
Click the expand card button and the PDF file will display in fullscreen view.


#21 Adjusting Text Styles for Note Cards
In right sidebar the search box to find PDF files by keyword. This type of file can create highlight cards (just drag the highlighted text to the whiteboard area on the left), and we'll cover the detailed tutorial in a later deep dive article. These highlight card Notes can serve as regular text areas where you can adjust text styles, and the content syncs between both.

#22 Note Cards Can Also Have Tags
Card Type Formats section, mentioned that each card type can have tags added. Here I'll demonstrate how to add tags to a Notes card.
Step 1
Click the three dots in the top right corner of the Notes card
Step 2
Click Manage tags, or pressCtrl+Ton your keyboard to add tags to the card
Frequently Overlooked Important Features
This section shares super important features that are often forgotten. Highly recommended viewing!!!!
#23 Workbench Tab Groups Feature
Switching workbenches is like switching to a different mindset for work. I use it to switch between different work scenarios, such as 'Work Brain', 'Teaching Brain', 'Content Creator Brain', 'Learning Brain', and 'Daily Activities'.

Creating folder categories within a workbench:
- Click the three dots at location #1
- Press + New tab folder Add a new folder
- Name the category folder
- You'll notice a new folder shelf appears on the left workbench!
Adding a new workbench:
- Click the down arrow at location #2
- Press + New tab group Add a new workbench
- Name the new workbench
- Press the down arrow again, and you'll discover an extra workspace!
#24 History
After exiting the screen, press again Ctrl+Z Usually you can't get back to it, so you need to check if the data you want to recover is in the history. Below we introduce where to find the history records for 'whiteboards' and 'cards'.
Whiteboard History
Step 1&2
Click the three dots in the upper right corner of the whiteboard, three dotsthen click Version history
Step 3&4
to view all past states of this whiteboard. To restore it, click the blue Restore version button
Card History
Step 1&2
Press the three dots in the upper right corner of the card, three dots click Version history
Step 3&4
to view all past states of this card. To restore it, click the blue Restore version button
#25 Two Types of Trash Bins
This feature is a godsend for the clumsy! If you accidentally delete data, you can always recover it from here. Think of it like the Recycle Bin on your computer.
Trash Bin
Step 1&2
Click the Heptabase text, then press Trash Open Trash
Step 3
and you can see all the deleted data is hereIf you don't want to empty the trash, be careful not to click 'Empty Trash' in the upper right corner, or the data will be lost forever!

Step 4
To restore data to its original location, click the data and then press Restore
Create Your Own Trash Whiteboard
I created my own trash whiteboard—it's very simple. Just create a whiteboard and name it 'Trash' XDD. It's really useful! I put data I can't bear to delete but don't want cluttering my computer into this 'trash whiteboard'.

#26 Sync Status Indicators
This feature is super important! The first thing you must do every time you open the software is check the traffic light status. If you don't pay attention, you can easily overwrite data and risk losing it! So you must understand this feature.

- Green Light
means all your data has been synced successfully and you can freely use Heptabase.

- Gray Light
means you're currently offline, usually appearing when you don't have internet!

- Yellow Light: Syncing...
appears when you're uploading data into Heptabase. Remember to wait until the yellow light turns green before using the software.

- Yellow Light: Connecting... Connecting...
When you transition from offline to online mode, Heptabase also needs a moment to connect to the internet. Please wait until the status turns green before starting to use the software.

- Blue light Syncing... Syncing in progress
Like the yellow light, it's syncing. Remember to let the system run for a bit first, and start operating once it turns green!
There's also a red light status (sync error or failure), but I've never encountered it myself! And I hope I won't XD I recommend everyone use Heptabase while connected to avoid the risk of data loss.
#27 Deep Dive: Open in New Tab
I personally need the visual whiteboard to brainstorm projects or conduct in-depth research, but many people are hierarchical thinkers. For them, using the 'open in new tab' function works well for top-down thinking.
- Visual thinkers: Open whiteboard on the left, cards or files on the right panel
- Hierarchical thinkers: Open a card on the left, cards or files on the right
Step 1
Select multiple cards you want to research in depth at once
Step 2
Click on the top left three-dot icon(or right-click) to bring up the menu, then click Open in new tab
Step 3
You'll see the left side = the expanded card, right side = other selected cards
Many people use this method for writing brainstorming, putting reference materials on the right and using the left for creation.
#28 Viewing Hierarchically Arranged Whiteboards
Hover your mouse over the Map in the left panel, and you'll see a hierarchically arranged whiteboard. You can see my 'Personal Brand Operations' whiteboard, which contains several whiteboards on this topic.
in the list, then click > icon to expand or collapse these whiteboards.

Handy Mouse Tips
Here I'll share some mouse tricks that few people know about with you fans. They're really useful, so please keep reading!
#29 One-Click Browse Entire Whiteboard
My most frequently used feature. I put this in the mouse area rather than keyboard shortcuts because I prefer clicking directly—it's more intuitive! It's similar to how other design software works.
Click the % button to automatically adjust the entire whiteboard to a fitting size. You won't have to worry about what to do if there's too much data! You can see the full whiteboard at once and then zoom in to view the details.

#30 Opening Google Search
So Heptabase has integration with Google Search? This feature is interesting, but I rarely use it because I'm more used to searching with keyboard shortcuts in Arc Browser~
Step 1&2
Select the text you want to search anywhere, then press right-click, click Search with Google
Step 3
will automatically open a Google search for the text you just selected
#31 Selecting Text & Selecting Paragraphs
This is also interesting—a little tip I discovered by accident. Very useful!

- Double-click text = select a word
The system automatically identifies phrases or individual words

- Triple-click text = select a paragraph
The system automatically selects all text in that paragraph
Templates
Many people ask how I use the template feature. I do have my own usage logic developed, but there's already so much information in this article XD So let me give you a brief overview of how to use this feature!
#32 Bringing Up the Template List
There are two places you can access the template list: first from the left panel, second from within a card.

- Access the template list from the left panel
Click on the left sidebar's Heptabase Then click Templateand a template list will appear

- Bring up template list from within a card
Type the string "/template" within a card, then click Templateand a template list will appear

#33 Custom Templates
You can design your own templates and turn all frequently used formats into templates, so you won't have to copy and paste repeatedly in the future. Here we use a multiple-choice format as an example.
Step 1-3
Select the data you want to become a template, and click the six dotsclick Create template
Step 4
The system will ask you to name this template. After typing the name, press Save
Step 5
You'll see a "Template added" notification at the top of Heptabase, indicating the template has been successfully added to your template list
Step 6
When you open the template list now, you'll find the "Multiple Choice" template you just created at the top
#34 Slash / to Call Up Custom Templates
After learning how to create templates, how do you bring up a template? Building on the previous section, I'll use the "Multiple Choice template" I just created as an example to explain.
Step 1
Within a card or text box, type "/(the template name you created)"In this example I use multiple choice, so I type "/Multiple Choice," but actually while you're typing, you'll notice that as soon as you type "/Mult" (or the first few characters), the Multiple Choice whiteboard option will appear!

Step 2
Your originally selected template data will appear, and you can use it directly
Over 215 students have enrolled, leaving glowing 5-star reviews! The bonuses alone exceed the course value, plus I share exclusive Creator SOP workflows—original content you won't find anywhere else!!
Styling
#35 Beautifying Whiteboards with Images
This feature is really perfect for the ladies (laughs, aren't you KnowledgeGut fans? Why did it turn into "ladies"? 🤣), anyway it's great for women to use as a way to beautify their "bullet journal notes."
It's very simple—just drag a transparent PNG file from your computer into the whiteboard, or you can copy a transparent image from online and paste it into the whiteboard!


This feature is really so useful! I put several smiley faces in my joke whiteboard, so I can see which jokes get the most laughs. XDDD Sorry, I'm really a weirdo~ha.
🎁 Thank you for reading this far! I've prepared free resources for you ⬇
I'm giving you the 《Heptabase 13 Application Scenarios Inspiration Pack: Break Your Imagination!》 worth over $899~
《7-Day Heptabase Workshop! Build Your Knowledge Management System from Scratch》
This is a free online course I spent an entire month creating. Simply complete the 7-day workshop and follow the steps to finish assignments, and you'll completely transform your note-taking method and build your own Second Brain!
I'll guide you hand-in-hand (videos + text) to complete daily tasks:
- ✅ Day 1 Navigation Map
- ✅ Day 2 Dream Board
- ✅ Day 3 Inspiration Pack
- ✅ Day 4 Gratitude Journal
- ✅ Day 5 Organization Chart
- ✅ Day 6 Reading Notes
- ✅ Day 7 AI Summary
#36 Special Syntax Font: LaTeX
It's a LaTeX feature that Notion also has. Since I use Notion myself, I thought I'd try bringing my Notion beautification obsession to Heptabase, and it actually works! Haha!
I originally learned this feature from Chloe's article. You can click the image caption to read their article~there are more syntax variations you can copy! Below I'll share how to achieve the same effect in Heptabase.


Step 1&2
Type "/Math block" in a text box, or you can also click with your mouse
Step 2
Copy the syntax for the effect you want to display into the formula box, then modify the text yourself
There are many syntax display methods, but I advise you KnowledgeGut fans not to spend too much time on this feature. I lost a lot of time playing with it before. Remember to focus on what's important! XD!
#37 Using Images + Text for Table of Contents Navigation
This feature is often used for "Index Notes" in the Zettelkasten note-taking method, meaning you have a table of contents within one page to better guide others (besides the creator) to find information within the same whiteboard area.
It's very simple! Just place the image right after the text box. Usually the image layer will automatically display at the bottom. Here I've shown a table of contents text box*1, text boxes mentioning Cards*3, and a text box mentioning Section groups*1 (with an icon on the left).

Sharing
#38 Sharing Whiteboards
Want to share all your work and thinking content with others? You can use this feature to share your whiteboard online! You just need to give them a URL.
Note that since whiteboards can be very large, when you share one, you can adjust the whiteboard zoom size and data position beforehand. This will be explained in detail below.
Share Whiteboard URL & Sync Latest Updates
Step 1&2
Click the Share, then open Share to web button
Step 3
Successfully publish whiteboard info to URLYou can copy the 'public URL' and paste it to friends or colleagues to view. The Share button in the top right will also turn blue to Shared, indicating the whiteboard is being publicly shared!

There are two situations you must know:
- If you adjust data in an already-published whiteboard, the data in the originally published whiteboard won't sync automatically!
- To sync updates, you must click on Shared and then press Publish Changes for the data to sync to the public URL.
When sharing, the whiteboard is positioned at the top left
When sharing your whiteboard, if you don't pay attention to the zoom level and data position, your readers won't find the data in the whiteboard or may feel the scale is too large or too small, encountering various issues about where to view your public whiteboard.
But the solution is actually simple—click the Sharefrom whatever view you're in, and when others open the URL, they'll see exactly the same view, position, and zoom level as when you clicked Share.
So before sharing, pay very close attention to the screen size and position. After sharing, when you open the whiteboard link, it won't shift layout. The entire view depends on all the area to the 'bottom-right' of the 'top-left positioning point (the 🌭 in the image)'. You can imagine it as the 'fourth quadrant' in a coordinate system.
- After closingthe left sidebar, the hotdog is the correct positioning point
- Below, I present the situation with 'the screen before sharing' and 'the URL view after sharing' side by side for comparison

In this whiteboard, you can see the bottom 'Test OOO' card with text being cut off! The whiteboard zoom is also 114%.

You can see the bottom 'Test OOO' card is still cut off, and the zoom remains at 114%.

This time I moved all the whiteboard data to the right and added a vertical string of text on the left, then reshared the URL.

You'll find that when opening the URL, the new text on the left is indeed there, and the entire positioning point and whiteboard are exactly the same—the view won't shift to other parts of the whiteboard.
This discovery was truly groundbreaking. After discovering it, I immediately shared it with Heptabase's official customer service rep PJ, who said my discovery was amazing and hoped I'd share it with more people! (That's also when I started collecting these tips!!)
#39 Sharing Cards
Some people like to use one card like a Word document, writing complete content. In this case, you can share it by exporting the card as 'Markdown' or 'PDF'.
First, click the top right three dotson the card, or press right-click, to bring up the menu list, then click Export as Markdown to export as Markdown, or Export as PDF to export as PDF.

Markdown

Name this Markdown file

You'll see a zip compressed file appear in your Downloads folder. After decompressing, you'll find the .md file

Name this PDF file

You'll see a zip compressed file appear in your Downloads folder. After decompressing, you'll find the PDF file
Heads up! The PDF export feature is brand new (May 2024), so there might be some bugs. If you encounter any software issues, remember to report them to the official team!
Other Surprises
Here I'll introduce some surprise features that are hard to categorize XD Thank you for reading to the last section? I'm basically writing a book, and we've already passed 10,000 characters... crazy!
#40 Opening Whiteboards in Dual View
I've been requesting the official team to add a side-by-side dual whiteboard feature or the ability to open two tabs, but they assessed that it's too difficult to develop! Looks like they can't launch it quickly, so I had to find my own workaround! After all, as a visual person, I know where data is positioned on a whiteboard, but I forget the data names~ So I really need the dual-view feature!
It's simple to do dual view—just open both the web version and desktop version of Heptabase at the same time! Hahaha! Any changes you make on one end will sync rapidly on the other. You can open them on two screens side by side, but you can't drag and drop data between them.

#41 Database Feature
It's Notion's most powerful database feature, and Heptabase also has it—but it's hidden inside the Tag feature!! Pretty unique, right? That's why some people can't find it.
Because I was developing Heptabase's online course, I collected various user questions from many places. The database feature helped me see everything at a glance—if you want to learn, keep reading the tutorials below & my usage tips!
Step 1&2
Click the Tag, then press + New Tag Create new tag
Step 3
Click on the tag to enter, and you'll discover the database featureIn the red box area, there are two different view modes: Table is the database view mode, and Kanban is the board management view mode. I recommend all KnowledgeGut fans try them out yourself.

The team recently launched a relational feature that lets you link two tags back and forth. I haven't used this feature yet, since I still rely on Notion more for database functionality. If any KnowledgeGut fans discover some great uses for it, feel free to share in the comments!
#42 Task Dates
You can see task statuses for other dates—what needs to be done, what's already completed—and use it for time management!
Click the Journal, click to open the symbol on the right sidebarclick checkmark symbol, and you'll be able to see what tasks are scheduled for other days!

I rarely use this feature myself—I use Notion for my time management, and I use both software together without going all-in-one. But I think many people don't know about this feature, so I wanted to share it too~
🎁 Thank you for reading this far! I've prepared free resources for you ⬇
I'm giving you the 《Heptabase 13 Application Scenarios Inspiration Pack: Break Your Imagination!》 worth over $899~
《7-Day Heptabase Workshop! Build Your Knowledge Management System from Scratch》
This is a free online course I spent an entire month creating. Simply complete the 7-day workshop and follow the steps to finish assignments, and you'll completely transform your note-taking method and build your own Second Brain!
I'll guide you hand-in-hand (videos + text) to complete daily tasks:
- ✅ Day 1 Navigation Map
- ✅ Day 2 Dream Board
- ✅ Day 3 Inspiration Pack
- ✅ Day 4 Gratitude Journal
- ✅ Day 5 Organization Chart
- ✅ Day 6 Reading Notes
- ✅ Day 7 AI Summary
#43 Side-by-Side Images
You can't place multiple images in the same row within a card, so many people asked the Heptabase team to develop this feature. However, since the team has many more important features to develop (this is software that updates almost daily—they're super dedicated!), this feature, which already has an alternative solution, has been put on hold for now.
The alternative solution I'm teaching here is to use the Table feature!
Step 1
Type the string '/Table' to create a table
Step 2
The left side shows image arrangement without a table—only vertical stacking. The right side has a table—enabling horizontal arrangement.
#44 Merging Tables
Heptabase's table feature doesn't support the basic 'merge cells' function that regular spreadsheet software has, so the method I'm sharing today is also an alternative solution. You just need to copy and paste a table from Excel to merge cells!
Step 1
Create table data with merged cells in Excel, select it, then press Ctrl+G Copy table data
Step 2
Inside a text box or card, press Ctrl+V Paste table data, and you'll see the cells at the top are merged
However, the team recommends that tables copied from Excel may encounter style compatibility issues. Unless absolutely necessary, they don't recommend using this method. KnowledgeGut fans should evaluate for themselves.
#45 Toggling Dark/Light Mode in Two Locations
This feature is really important—it protects your eyes! All browsers and software on my computer are set to dark mode, but if all the Heptabase screenshots on my website have a black background, it looks too ugly XD I can't accept that, so I have to switch to light mode. After I finish writing the article, I switch back.

- Click the gear icon Icon
- Click on General
- You can see the light mode and dark mode options

- Click on Heptabase in the left sidebar
- Click Dark mode or Light mode
- Switch between dark and light modes

Conclusion
This is my fourth article, and I've discovered I'm truly a detail-obsessed long-form writing fanatic. If I don't explain simple things in meticulous detail, I feel uncomfortable! If images don't have beautiful colorful backgrounds & KnowledgeGut's smiling logo, I feel like I've left something undone (Sorry XDD I've never been this serious at work, only when building my own business!).
Word Count and Time Investment for This Feature Tutorial?
Many people ask how much time I spent on this article. Since I regularly follow many of these techniques, organizing them into a comprehensive article overview has consumed countless hours.
But after I started writing, I properly tracked this article (project) time! I timed it like a project hahaha, totaling over 45 hours and approximately 15,000 words—almost like publishing a book! Thank you for reading this carefully crafted article.
Through creating this article, I also developed my own content production workflow. For my next 3,000-word article, I only spent 1.5 hours! I'll share my creative process with you when the opportunity comes~
Heptabase is currently paid software

Are there any promo codes or discount codes?
- Monthly plan: $11.99 USD/month
- Annual plan: $8.99 USD/month
Monthly cost: $11.99 USD (approximately 390 NTD per month)
Annual cost: Total is $8.99 USD × 12 months = $107.88 USD (approximately 3,300 NTD per year)
Which plan is more suitable for me?
No discount codes unfortunately. However, all accounts can use it free for 7 days. If you're very interested in this note-taking software and want to try it out, you can click the button below to try Heptabase. This would also be like buying Xiaochang a latte, giving Xiaochang more motivation to create and write content. Thank you for reading.
On 2024/12/09, when I saw this update, my jaw dropped @@. After trying so many Podcast transcript collection software, I didn't expect Heptabase to come up with this feature!
◽ If you just want to try it out, please select the 'Monthly Plan'
Heptabase provides new users with a 7-day free trial period. After the trial period, the monthly subscription fee will be charged.
◽ If you decide to subscribe long-term, please select the 'Annual Plan' (Xiaochang recommends 🌭)
The reason I recommend it is simple: using a notes app for just 1 month is barely enough to feel its power. I jumped in in 2023/09 and bought a year subscription right away. After three months of using it, I became a passionate fan and partner promoter, and that's when I started what you all know as the 'KnowledgeGut' blog.

And the course experience sharing came from that too. It all happened because I subscribed to the annual plan, which changed my life trajectory 😜
🌭 Welcome to the Gut Community 🌭

Completing this article feels like reaching a life milestone. It's made me realize how impressive and patient previous writers of functional content and books are! 15,000 words paired with hundreds of images is no joke, haha, but it's also shown me: OK, I can do this! Long-form writing is within my capability.
Did you notice the view count statistics in the bottom left? I just set it up after discovering the Independent Analytics traffic analysis plugin through the "Driving Digital Marketing" website—I love it! Check out this article: Independent Analytics

小腸🌭(楊婷雅 / Phoebe Yang)
知識包小腸創辦人 | 兩岸 PKM 陪跑顧問
把你的知識變成「會複利的個人資產」——
鍛鍊第一大腦、打造第二大腦(Heptabase)、駕馭 AI 第三大腦。
專精卡片盒筆記法、自創記憶術筆記法、AI 自動化、AI 智能體系統。
已陪 2,000+ 位專業人士搭建個人知識庫。
📩「腸篇大論」電子報 · IG @knowledgegut · Threads @knowledgegut

If you have any questions about the article content, or if there are any parts you'd like me to elaborate on, feel free to leave a comment below and let me know~
Some links in the article are "Affiliate Marketing" links. If you click through and make a purchase, Xiaochang receives a tiny little bit of commission (it won't affect the price).
by Knowledge Management Mentor Xiaochang🌭


This article is really helpful! The 45 techniques gave me a deeper understanding of Heptabase, especially the productivity enhancement section. I feel like I've become more efficient myself. Looking forward to more technique tips in the future!
I've been using it for a while but didn't know there was a PDF import feature until I saw your introduction
Came back specially to say thanks XD
Haha, coming back specially to comment is so sweet! I've learned new tricks these past few days! The updates will be finished by the weekend~ You can bookmark the article and look forward to it 😌!
I learned many great tips, thank you!
Hi Kyte, thank you for the encouragement.
This article is meant to teach you tons of great tricks~ Let's increase productivity together!
I'm a beginner with Heptabase. Thank you for such a thoughtful and detailed practical teaching article—the learning gains go far beyond "a lot"! Thank you so much~~~
Hello, beginner Candice~ I'm so glad I could help you even beyond "a lot"—so much more haha. Thank you for your comment, it motivates me to keep creating and teaching 💛
Hey! Thank you for sharing such a comprehensive article, especially the dual-whiteboard approach is so creative! I never thought of that!
I'm going to use it right away XD You helped me out big time!
Not at all~ I remember Ian is also a huge Heptabase fan~ and often teaches classmates in Waki's courses! You're great too, let's chat again sometime 🙂
I'm so glad I could help! Thanks for the feedback, I'll keep working hard on writing!