
Every day, so many future students (?) ask me about Heptabase‘s tips and feature walkthroughs. And since I’m a hardcore note-taker — the kind who logs even ridiculously funny jokes XD
so whenever someone asks me a question about Heptabase and I feel like my answer actually helped them, I jot it down in my Heptabase Journal (which I use as my inspiration scratchpad). Once I’d racked up 45 tips, I decided to write this one giant all-in-one tutorial — to really let the knowledge flow and share it with all the fellow Guts who need it.
This post is for people who already subscribe to Heptabase — whether you’re a veteran or a newbie, there’s something here for you. A lot of these are uses you probably never even noticed you could pull off! If you haven’t subscribed to the app yet, fellow Guts, you can hit the button below to sign up and start a free 7-day trial right away (and if you want a free 30-day trial, buy my Input-Output course, and I’ll gift you the $11.99 subscription fee).
If you want to dig deeper into what this productivity note-taking app can actually be used for, go check out the article below. It gives you a rough overview of all the surprising places this note-taking app can fit into — I promise you’ll come away pleasantly surprised 🎁
✦ Heptabase 10 must-learn ways to use it! From project management and travel planning to running a one-person company — nothing held back, all revealed Where do I find Chinese-language support? And how do I get support to send me a complete answer fast? Use the built-in AI to generate podcast transcripts and summaries for free — leaving every other note-taking app in the dust
Changelog
• 2024/10/14 #26 added the blue-light state to the traffic-light system • 2024/12/26 fixed mismatches between the text in the images and the tutorial text, plus English typos • 2025/02/12 added an interface overview table to help newbies get up to speed faster • 2025/03/08 Input-Output paid coursehoping to help even more people, so I embedded the recommendation into the article • 2026/05/13 added an intro section at the top — ‘What is Heptabase? Who are these 45 tips for?’ — so new readers know right away whether it’s a fit for them📌 Read this first📌 Before you dive into this packed Heptabase tutorial, please keep these six things in mind
- Click any image to zoom in
Since this was my very first feature article, the text inside the images in the first half is honestly a little on the small side — you’ll need to manually click an image to enlarge it so you can read the text more clearly!
- Feel free to skip around this article
There’s honestly so much content here, and some of the features are ones you can’t be bothered to keep up with the official updates for — whereas I follow the official news every single day, so I can pass those features along to you.
- For any use you haven’t seen before, definitely use the table of contents to jump straight to it
Some of these uses are little details I discovered on my own, and they’re also the most commonly overlooked features. I’m not covering every single basic, nitty-gritty function here — if I did, it’d take three days and three nights and I still wouldn’t finish XD. I’m only sharing the often-overlooked little tricks, and if you learn them, they’ll genuinely boost your productivity quite a bit.
- As you read, think about how you could use these — not just my example use cases, but your own spin
The use cases I screenshot and share with you are ones I came up with after mapping out my own needs, so they’re tailored to how I personally use it. Besides applying my methods to your own Heptabase, remember to spend a little time thinking about how, in your own context, you’d optimize my version of each use — that’s how you’ll really grasp the essence of the Heptabase note-taking app.
- This article focuses mostly on the desktop tutorial
The phone and tablet versions have many features this article can’t help with, so remember to open the desktop or web version to use them! On mobile, the only thing I use regularly right now is the Journal, but I’ll still record mobile features for you down the line. If you have any questions or requests, feel free to drop a comment below or head over to IG to ask.
- A heads-up on the text styles in this article
Text highlighted with a gray marker = a feature you click on with your mouse inside Heptabase
Red text with a solid raised background = a keyboard shortcut. Mac users, just read Ctrl as the Command (or Cmd) key ⌘!
The shortcuts mentioned in this article are all ones I use regularly; the ones I rarely or never use I’m skipping for now. So for some features I’ll teach the keyboard shortcut, and for others I’ll teach you to click with the mouse. I’ll put together a full shortcut list to share with everyone down the road ~!
⭐ Alright, let’s get into the good stuff ⭐
What is Heptabase? Who are these 45 tips for?
Heptabase is a digital note-taking app built around a ‘whiteboard + card’ core architecture. It lets you break information down into the smallest-grain cards, then connect and think through them on a visual whiteboard. This complete 15,000-word tutorial covers 45 practical features: interface basics, card techniques, mind maps, shortcuts, PDF annotation, templates, sharing, and more.
Who it’s for:
- Heptabase newbies (the first 20 tips)
- Intermediate users who’ve been at it a while and want to level up their efficiency (21-35)
- Advanced users hunting for lesser-known features (36-45)
The app interface
Newbies absolutely need to understand the layout of this screen first, otherwise the rest of the content won’t make sense!
Full interface overview table
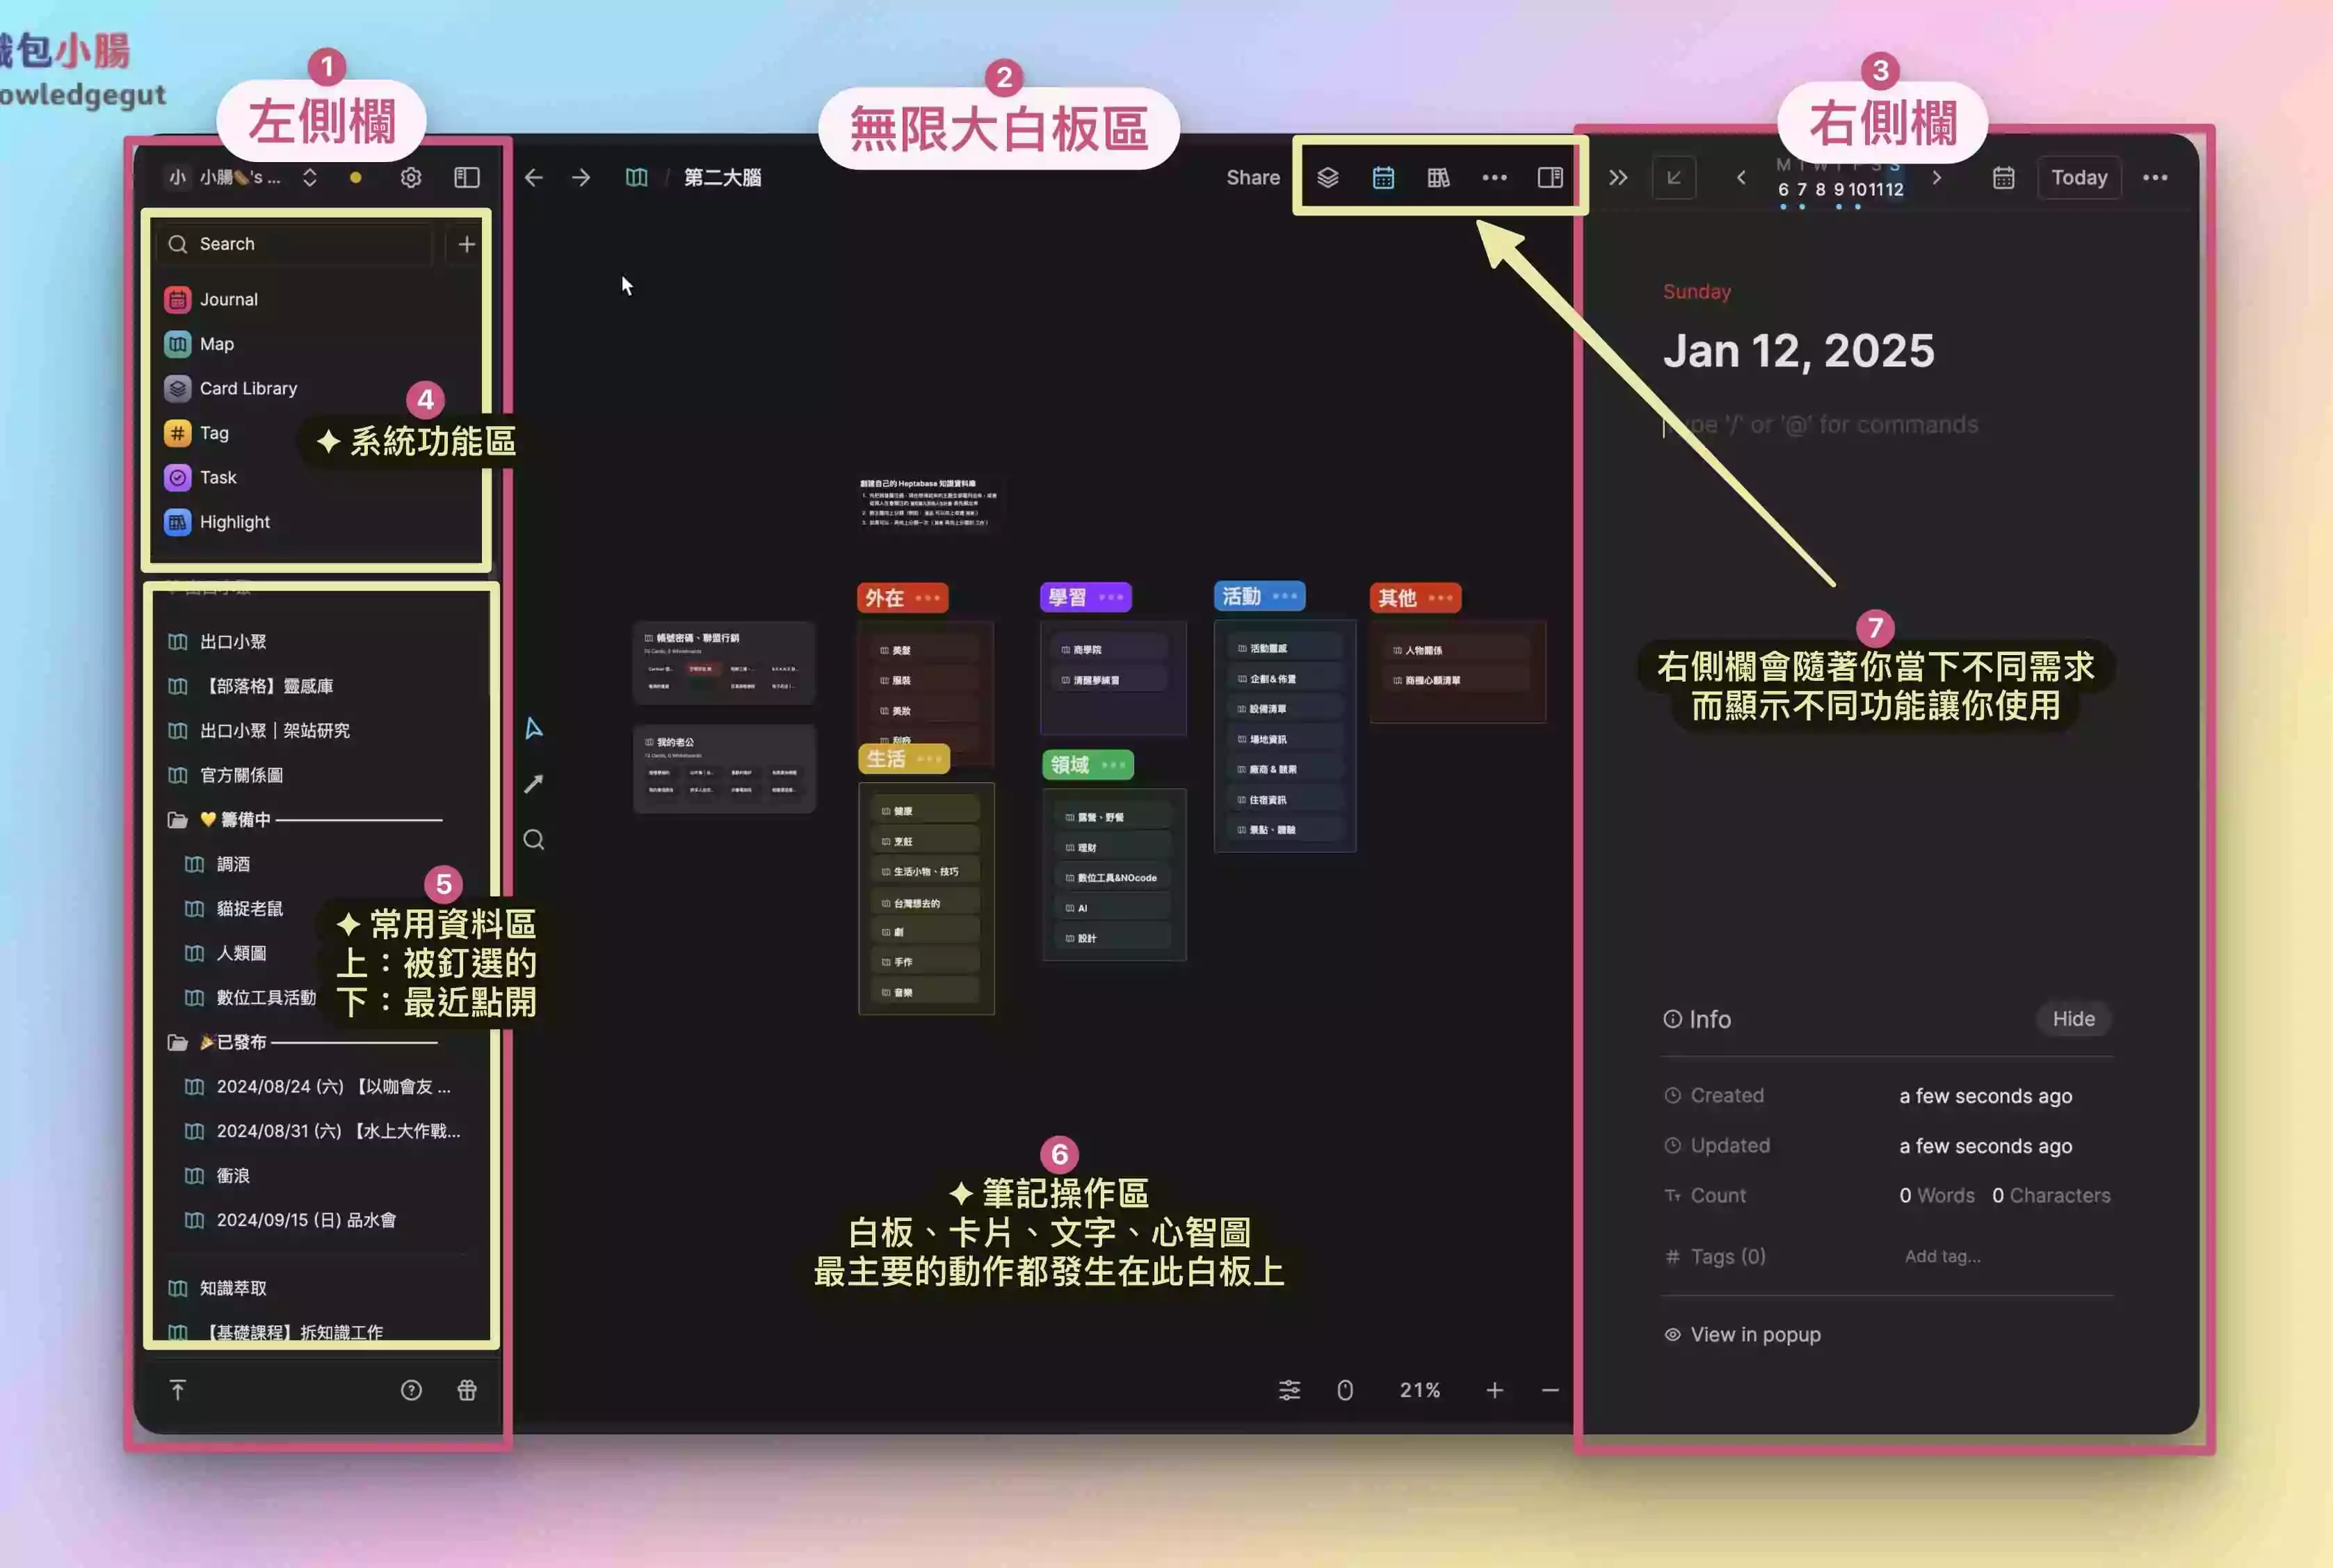
- Left sidebar
The universal-features zone, including items 4 and 5 in the image — both live in the left sidebar. This overall structure never changes no matter what you’re doing. - The infinite whiteboard zone
Like item 6 in the image explains, this is where all your note-taking and thinking happens. You can freely zoom the whiteboard in and out. - Right sidebar (scrolls up and down)
The variable-features zone. Click any of the icons at item 7 in the image and the function shown in the right sidebar changes — it keeps shifting depending on the context. - System-features zone
Heptabase set up these few main areas for you to jump between, plus a search box that lets you find all kinds of data. - Frequently-used data zone (scrolls up and down)
Favorites (the whiteboards or other content you’ve pinned yourself) and recently opened items.
Card
#01 The 7 forms of a card
I’ve taken screenshots of all seven card forms so you can see them. Use these screenshots to spot what’s different and what’s the same across these card types. Cards are one of the most fundamental things you must know in Heptabase, so please read this image-and-text section carefully.

- Form one: the regular card
The original, default card form — you can put any kind of data inside a regular card!


(image source: the Attack on Titan anime)
The regular card is the most common, most fundamental feature you have to know. You can put any data inside it and freely adjust the text styling and formatting. In Zettelkasten terms, this regular card is where you place the smallest-grain knowledge point.

- Form two: the PDF document card
The image shows the document-card form of a PDF slide deck from one of my talks, displayed inside Heptabase.

- Form three: the date card
The image is the inspiration notes I logged on 2023/11/04. This data only appears within that day’s date card, and a new date card is generated automatically every day.

- Form four: the highlight card
When you use the highlight or annotation tools on a PDF inside Heptabase to crop or mark out the key points, you create a highlight card.

- Form five: the video card
One video = one card, and you can’t add text or any other elements onto it!

- Form six: the image card
One image = one card, and you can’t add text or any other elements onto it!

- Form seven: the audio card
One audio clip = one card, and you can’t add text or any other elements onto it!
- If you want to add text to a ‘video card,’ ‘image card,’ or ‘audio card,’ create a ‘regular card’ and drag the video, image, or audio into it. That turns it into a ‘regular card containing those media files,’ rather than a video card, image card, or audio card.
- All of these card forms can also be Ctrl+Tgiven a Tag!
🎁 感謝你看到這裡!我準備了免費資源送你 ⬇

▲ 點圖領禮物 🎁 ▲
《7 天上手 Heptabase 工作坊!從 0 開始打造你的知識庫》
這是一堂我花了一整個月製作的「免費線上課程」。只要看完 7 天的工作坊並依照步驟完成作業,就能徹底改變你的筆記方式,建立你專屬的第二大腦!
我會手把手(影片+文字)每天帶你完成任務:
- ✅ Day 1 導航地圖
- ✅ Day 2 夢想板
- ✅ Day 3 靈感包
- ✅ Day 4 感恩日記
- ✅ Day 5 組織圖
- ✅ Day 6 閱讀筆記
- ✅ Day 7 AI 摘要
#02 Truly deleting a card on the whiteboard
I’m always accidentally creating a new card (a quick double-click of the mouse adds one), and the usual way to delete is to just select the card and hit the ← Backspace‘ key to delete it — but I later realized that the deleted cards still exist inside the Card Library!
To truly clear out the cards you never used at all, I found that following the steps below lets you delete those cards directly on the whiteboard, making them genuinely disappear from your Heptabase card library.
Step 1
Select the card (drag-select / click directly), and the card will show a blue border, indicating the selected state
Step 2
Right-click your mouse, or click the three dots in the top-right corner
Step 3
Hit ‘delete this card from the card library’ Delete from card library, and it’s truly deleted from the library!
Even after you’ve truly deleted a card and can’t find it in the card library, if you really want it back, you still can! Head to the ‘Trash’ inside the Heptabase logo in the top-left to check on accidentally deleted cards — Trash — for the detailed steps, see the tutorial in the Trash chapter。
#03 One-click delete empty cards
The upside of clearing out empty cards is that when you open the card library Card Library, the whole view feels cleaner and lighter — kind of like the unused stuff sitting around your house that’s basically begging for a Marie-Kondo declutter.
Step 1
Open the left sidebar’s Card Library
Step 2
Select Delete empty cards(the broom icon)
Step 3
The empty ‘A wonderful new card’ cards all vanish — yay~
#04 Copying a card: unsynced cards vs. synced cards
You can also hit the Ctrl+C keyboard shortcut to copy a card.
Dismiss (unsynced):
the original card and the copied card are two separate cards — you can type whatever info you want into each and they won’t sync.
Sync pasted card:
the original card and the copied card will have their contents synced.
Step 1
On the card you want to copy, right-click and hit Copy
Step 2
Wherever you want to place the card, right-click and hit Paste, or just hit the Ctrl+V keyboard shortcut to paste the card
Step 3
Choose the unsynced card Dismiss, or the synced card Sync pasted card
- Choose the unsynced card Dismiss
and you’ll find the copied card has zero relationship to the original — you can write in each one freely, and it’s back to being a regular card!

- Choose the synced card Sync pasted card
and you’ll find the two cards behave identically. Plus, when the two cards live on different whiteboards, the top-right corner of the card shows which whiteboards this card appears on.
#05 Copy link: inner card, outer card, title link, card link
The copying I covered in the last section — ‘copy card’ — triggers card syncing and non-syncing. This section is about ‘copy link,’ which has a solid four different ways to play with it.

Form one: the inner card Paste as embed
Step 1
On the card you want to copy, right-click and hit Copy link
Step 2
‘Inside another card,’ Ctrl + V paste the link (the mouse right-click won’t show a paste button here, so use the keyboard)
Step 3
Choose Paste as embed , and it becomes an inner card (a card within a card)The 〈Take it slow, and you’ll have the room to change your mind〉 card now appears inside the 〈Keep the right to change your mind for yourself〉 card — it’s become an inner card.
And the 〈Take it slow, and you’ll have the room to change your mind〉 card — the ‘inner card’ — will sync with the ‘original card’!

You can edit the text in an inner card, but once you do, the original card gets edited and synced right along with it.
Form two: the outer card Paste as embed
The principle behind the outer card is ‘embedding the original card inside a text element‘. This part is a bit more complex, so if you don’t have a specific need for it, just skim it and move on! Personally, I rarely use this feature.
Step 1
On the card you want to copy, right-click and hit Copy linkStep 2
On ‘an empty spot on the whiteboard,’ hit Ctrl + V to paste the link (the mouse right-click won’t show a paste button here, so use the keyboard)Step 3
Choose Paste as embed , and it becomes an outer card
If, in step two, you paste ‘on the whiteboard’ instead of ‘inside a card,’ it becomes an outer card. You can think of it like this: an outer card = an image — you can’t change its text content or text styling, so to delete it you can only delete the whole outer card; you can’t delete the text inside the outer card.
Method three:Title link Paste as mention
Step 1
Right-click the card you want to copy, then hit Copy linkStep 2
Click on “any blank spot,” then press Ctrl + V to paste the link (right-click won’t give you a paste button here, so use the keyboard)Step 3
Choose Paste as mention, and it turns into a title link, done!Click the title link and it’ll jump straight to the original card — exactly the same effect as Mentioning @the card name directly! For the full walkthrough, check out the Mention chapter tutorial。
-1.png-1.png)
Method four:Dismiss card link
Step 1
Right-click the card you want to copy, then hit Copy linkStep 2
Click on “any blank spot,” then press Ctrl + V to paste the link (right-click won’t give you a paste button here, so use the keyboard)Step 3
Choose Dismiss, and it becomes a plain link — “4” in the imageClick this link and it jumps directly to the card it points to

That last card link has a neat little trick!! You can copy a card link and then paste it onto a piece of text to turn that text into a hyperlink — click it and you’ll jump to the card it links to. This comes in super handy when you don’t want to Mention a card with a really long title.
#06 Auto-expanding card v.s. scrollable card

- Card 1 in the image
No matter how much you type, the card automatically stretches “downward” so there’s never any worry about the text getting cut off — and as it grows, it pushes other objects out of the way.
- Card 2 in the image
Hover your mouse over the edge of the card until the cursor turns into a double arrow, then drag to resize it — once you do, that card loses its auto-expanding ability, because you’ve actively “set the size you want” for it! In exchange, though, it gains a scrollbar so you can scroll up and down to reveal the part you want to see.
To turn a non-expanding card on the right back into an auto-expanding card on the left, just right-click the card and choose fit to content, and it’ll switch right back to the card on the left.
Mindmap
#07 Mindmap collapse feature
For this part, let me use the talk I gave at the WordPress meetup on Mon 2024/04/22 as an example! Mindmaps can be collapsed — you can temporarily fold away the parts you don’t want to see.
Step 1
Right-click on the whiteboard (or on a card) and select Mindmap Mindmap
Step 2
Type out your own mindmap contentThe mindmap content here uses the mindmap-linked card trick

Step 3
Right-click on a text or card node and select collapse card >< Fold node
If you want to expand it layer by layer, start collapsing from the outermost layer and work inward — that way it’ll open up layer by layer too. I use this for “talks” and “sharing sessions” — I’ve run meetings and given presentations this way and honestly find it super handy haha.


If you want to expand everything at once, just go to the source of the mindmap (Image 4) and select collapse card >< Fold node, and that’s it — one click on the arrow and the entire chain of content behind it will expand right out.
I really love the mindmap inside Heptabase. As a super visual person, I really need this kind of effect where information unfolds while still staying connected to everything else. In the online knowledge-management course I’m planning to launch later this year (fingers crossed it actually happens XD), I’ll teach you properly how to use this feature.
#08 Custom mindmap line colors
Remember how a ton of users kept wishing for this feature? The team finally built it 🎉🎉
Step 1
Same as the steps above — first right-click on the whiteboard (or on a card) and select Mindmap MindmapStep 2
Type out your own mindmap contentStep 3
Right-click “on a line” of the mindmap and pick a color

One thing to watch out for here: when you change a color, it changes the color of everything after that line in the mindmap. So if you pick the color of the mindmap’s source line, the entire mindmap’s lines will all get recolored together!
#09 Mindmaps can link to cards
After creating a mindmap, drag a card next to it and a connecting line will appear — let go of the mouse and the card will be successfully linked to the mindmap.

Here’s a little tip for you all! If you find a regular card too hard to link to a mindmap, click the Fold down arrow at the top-left of the regular card to shrink it (so only the title is left), then drag it over next to the mindmap — it’ll become super easy to link to the mindmap that way~!

《有效輸入 ∞ 快速輸出》用 Heptabase+ ChatGPT AI 實現下班後的創作夢!
目前已經超過 215 位學生購買課程、學生回饋都在寫小作文、各種五⭐好評!課內贈品已經超越課程價值,還直接分享當創作者的 SOP 流程,原創課程,外面絕對學不到唷!!

Mention
This feature doesn’t work with whiteboard names, just so you know! It only works inside text and cards.
#10 Two ways to Mention
First search method: type the symbol @ + keyword

Second search method: type the symbol [[ + keyword

#11 Both full-width and half-width symbols can bring up Mention
Personally I’m very used to the first method, “@” + keyword, but one day I discovered that even the full-width “@” works too!

Just remember, since it’s a full-width character, you have to press Enter first to lock in the @ symbol before you can use the arrow keys to select the data you’re mentioning!
#12 Mention a Journal card for a specific date
Besides mentioning cards, whiteboards, and groups, Mention can also reference dates! The one I use most is the format “@2024/03/20” to mention a Journal entry.

#13 After you Mention a card, deleting text is totally fine
This is another super cool feature I stumbled on one day: once you Mention a card, you can make that title link text as short as you want — as long as a single character remains, it’ll still link through.

A heads-up here: if you Mention the same card twice inside a card, the second title link won’t click through to the original card! Like the “the basics of success, not until the” in the image above — it can’t be clicked to jump anywhere, it just shows the link URL.
Advanced concept: if you haven’t edited the title link text, then when the original card’s title changes, the linked title will sync and change along with it. But the moment you delete or add a character, it stops updating live with the original card and instead becomes a plain hyperlink.
Hot Key
Here I’ll just share the keyboard shortcuts I personally use most often. If you want to see all of Heptabase’s shortcuts, you can check the keyboard shortcut list in the official Wiki, or click the Keyboard shortcuts。

#14 Search
Search is a feature pretty much every app has, but in Heptabase there are actually different ways to search — let me show you three.
Method one: search within the current whiteboard, Ctrl + P
Step 1
Inside the whiteboard you want to search, press the shortcut Ctrl + PYou’ll notice the bottom-left of the search box only shows the name of your current whiteboard, exactly matching the whiteboard path name up top. In this image the whiteboard name is “Used for teaching on Mon 2024/04/22.”

Step 2
Type the keyword you want to find into the search boxOnce you enter a keyword, everything that pops up is all the content from the current whiteboard, “Used for teaching on Mon 2024/04/22” — the left side shows all the search results, the right side is a preview mode of the content.

Step 3
Click a result, and it auto-jumps to that content’s locationHere I clicked the text “Write directly in WordPress’s post editor based on the title,” so it jumped right there — and you can see the whiteboard path up top still hasn’t changed。

Method two: search everywhere, Ctrl + O
Step 1
Press the shortcut at “any spot” on the whiteboard Ctrl + OYou’ll notice a difference from the first method’s Ctrl + P search box — the bottom-left of the box now says “Quick find,” which means you’ve opened the global search feature.

Step 2
Type the keyword you want to find into the search boxHere the keyword we’re searching, “article,” is the same word as in the first method above, but you’ll notice there’s way more content now — because the results aren’t limited to the current whiteboard, they’re everything across your entire Heptabase.

Step 3
Click a result, and it auto-jumps to that content’s locationHere I clicked the whiteboard “How to write a good blog post,” so it jumped straight to that whiteboard — and you can see the whiteboard path up top changed along with it!!

Method three: search within the current card, Ctrl+F

- Press the right sidebar symbol at spot 1, and it’ll automatically place that card in the right sidebar
- Press Ctrl + F to bring up the card’s search box
- Type in the keyword you want to search within the card
- Click the < or > inside the search box, and you’ll see the searched keyword highlighted in orange-yellow


- Press the expand card symbol at spot 1 to blow that card up to full screen
- Press Ctrl + F to bring up the card’s search box
- Type in the keyword you want to search within the card
- Click the < or > inside the search box, and you’ll see the searched keyword highlighted in orange-yellow


- Press the Journal symbol at spot 1 to open the Journal in the right sidebar — and remember to click the date you want to search here
- Press Ctrl + F to bring up the card’s search box
- Type in the keyword you want to search within the card
- Click the < or > inside the search box, and you’ll see the searched keyword highlighted in orange-yellow

- Press the left sidebar’s Journal to open the journal in full screen
- Press Ctrl + F to bring up the card’s search box
- Type in the keyword you want to search within the card
- Click the < or > inside the search box, and you’ll see the searched keyword highlighted in orange-yellow

- Bring up a PDF file in the right sidebar, press Ctrl + F to bring up the card’s search box
- Type in the keyword you want to search within the card
- Click the < or > inside the search box, and you’ll see the searched keyword highlighted in orange-yellow
🎁 感謝你看到這裡!我準備了免費資源送你 ⬇
▲ 點圖領禮物 🎁 ▲
《7 天上手 Heptabase 工作坊!從 0 開始打造你的知識庫》
這是一堂我花了一整個月製作的「免費線上課程」。只要看完 7 天的工作坊並依照步驟完成作業,就能徹底改變你的筆記方式,建立你專屬的第二大腦!
我會手把手(影片+文字)每天帶你完成任務:
- ✅ Day 1 導航地圖
- ✅ Day 2 夢想板
- ✅ Day 3 靈感包
- ✅ Day 4 感恩日記
- ✅ Day 5 組織圖
- ✅ Day 6 閱讀筆記
- ✅ Day 7 AI 摘要
#15 Forward, back
Step 1
On your current whiteboard A (Used for teaching on Mon 2024/04/22), click the mentioned whiteboard B (【Blog】Inspiration Pants), and you’ll jump over to whiteboard B
Step 2
After pressing the shortcut, the view goes back from whiteboard B to whiteboard A- MAC:⌘ + [ or ]
- Windows:Alt + ← or →

Step 3
Now if you press the shortcut for the other direction, you’ll go from whiteboard A back to whiteboard B againThis feature is great for talks, lectures, and meetings — you can jump the view in real time so the people in the room can follow along. I always use it when I give a presentation! Once you learn it, you’ll never have to go hunting for the previous section again.
#16 Redo, Ctrl+Shift+Z
Press Ctrl+Z to undo, then use this when you change your mind and want to take that undo back — because if you press Ctrl+Z to undo twice, you’ll jump back to where things were two steps ago, so this is definitely a feature worth learning.
Step 1
Select the data you want and press ← Backspace to delete that item
Step 2
Press Ctrl+Z to undo, and the item comes back, returning to the state in Figure 1 where the data still exists
Step 3
Now press Ctrl+Shift+Z to redo, and you’re back to the Figure 2 state where the item was deleted#17 Sections
The Section feature is hands-down one of Heptabase’s killer features! A must-learn, must-learn, must-learn ⭐️⭐️⭐️
Step 1
Use your mouse to drag-select all the items you want to group togetherThose items can be any card, image, text, audio, or video — and even another group works too.

Step 2
Press Ctrl+G and everything inside your selection gets grouped into a Section, done!
After you drag-select, a black-and-white three-dot icon pops up in the top-left automatically. Click it, then press Create section, and you’ll get exactly the same effect as pressing Ctrl+G, except the keyboard shortcut is way faster.

Once you’ve grouped your data into a Section, you’ll notice that when you zoom out on the whiteboard, only the Section’s name stays visible while everything else shrinks down to tiny!
Right sidebar
This is where I’ll show you the goodies I discovered tucked away in the right sidebar XD — stuff a ton of people completely overlook!
#18 Table of Contents
It’s a bit like a table of contents for your whiteboard, but it only shows “whiteboards” and “Sections.” The ordering here is based on the absolute distance from the top-left corner.

- Press the open right sidebar icon at spot 1
- Click the Table of content icon at spot 2
- and you can see every whiteboard and Section inside your current whiteboard

For us bloggers, this is genuinely a lifesaver for managing articles! This is exactly how I check which article in each site category is already done — my blogging output flow. I’ve actually given talks and taught a few people about it already, and I’m planning to record a video to share it with everyone too.
#19 Whiteboard Info
Everyone knows you can open a card to see its info from inside the card itself — but what about the whiteboard? This feature lets you see where your current whiteboard has been mentioned.


- Press the open right sidebar icon at spot 1
- Click the ! exclamation mark icon at spot 2 to open the info panel
- and you can see where your current whiteboard has been mentioned
- Click to jump, and you can see the exact spot where it was mentioned
🎁 感謝你看到這裡!我準備了免費資源送你 ⬇
▲ 點圖領禮物 🎁 ▲
《7 天上手 Heptabase 工作坊!從 0 開始打造你的知識庫》
這是一堂我花了一整個月製作的「免費線上課程」。只要看完 7 天的工作坊並依照步驟完成作業,就能徹底改變你的筆記方式,建立你專屬的第二大腦!
我會手把手(影片+文字)每天帶你完成任務:
- ✅ Day 1 導航地圖
- ✅ Day 2 夢想板
- ✅ Day 3 靈感包
- ✅ Day 4 感恩日記
- ✅ Day 5 組織圖
- ✅ Day 6 閱讀筆記
- ✅ Day 7 AI 摘要
PDF files
#20 Four PDF modes
The “different modes” I’m talking about here mean the same PDF file can be displayed and used in different ways inside Heptabase.
Mode one: a PDF document card on the whiteboard
You can see this type of document is a card made from a PDF file. To create one, just drag a PDF from your computer straight onto the Heptabase whiteboard.

Mode two: PDF text file
Just drag a PDF from your computer into a regular Heptabase card.

Mode three: PDF file in the right sidebar
Press the right sidebar icon at spot 1, and the card gets placed in the right sidebar automatically — so the PDF file shows up in the right sidebar on its own.

One thing to watch out for: if you drop another card into the right sidebar too, you’ll find the right sidebar now holds two cards, and the PDF — which you used to be able to scroll up and down with your mouse wheel — can now only be flipped page by page with < or >.

Mode four: PDF expanded
Click the expand-card button and you’ll see the PDF switch to a full-screen viewing mode.


#21 Adjusting text styles on note cards
In the right sidebar search box, type a keyword to find your PDF. This type of file lets you make highlight cards (just highlight, then drag it over to the whiteboard area on the left). I’ll teach you the details in a later deep-dive article, but for now, know that the notes on a highlight card can act as a regular text area where you can adjust text styles, and the two stay in sync.

#22 You can tag note cards too
In the chapter on the 7 types of cards, I mentioned that every type of card can be tagged. Here I’ll just demo straight up how to tag a note card.
Step 1
Click the three dots in the top-right corner of the note card
Step 2
Click Manage tags, or press Ctrl+T on your keyboard, to tag the card
Important features people always overlook
Here I’ll share the super-important features that just never seem to stick in people’s heads — highly recommend reading this part!!!!
#23 Workspaces Tab groups feature
Switching to a different workspace is like swapping out your brain to get things done. I use them to shift between different work contexts — for example “work brain,” “course-building brain,” “creator brain,” “learning brain,” “today’s event.”

Organizing folders inside a workspace:
- Click the three dots at spot 1
- Press + New tab folder to add a new folder
- Name your category folder
- Over on the left in your workspace, you’ll find a new folder has appeared!
Adding a new workspace:
- Click the down arrow at spot 2
- Press + New tab group to add a new workspace
- Name your new workspace
- Click the down arrow again and you’ll find a new workspace has appeared!
#24 History
After you exit the screen and then press Ctrl+Z you usually can’t undo your way back. That’s when you need to check whether the data you want to recover is in the History — below I’ll walk you through where to find the History for both “whiteboards” and “cards.”
Whiteboard history
Step 1&2
Click the three dots in the top-right of the whiteboard, then click Version history
Step 3&4
and you can browse every past state of this whiteboard. To restore one, click the blue Restore version button at the bottom
Card history
Step 1&2
Press the three dots in the top-right of the card, then click Version history
Step 3&4
and you can browse every past state of this card. To restore one, click the blue Restore version button at the bottom
#25 Two kinds of trash bins
This feature is a true blessing for the clumsy-fingered among us — if you accidentally delete something, you can get it back right here! Think of it like the recycle bin or trash can on your computer.
Trash bin
Step 1&2
Click the Heptabase text in the left sidebar, then press Trash to open the Trash
Step 3
and you’ll see all your deleted data sitting right hereIf you’re not planning to clear out the trash, be careful not to hit Empty Trash in the top-right corner, or the data inside will be gone for good!

Step 4
To restore an item to its original spot, click the item and then press Restore
Make your own trash-bin whiteboard
My own homemade trash bin is dead simple: I just create a whiteboard and name it Trash XDD. It’s genuinely super handy — all the data I can’t bring myself to throw away but don’t want sitting on my computer goes into this “trash-bin whiteboard.”

#26 Sync status light
This feature is super-super important!! The very first thing to do every time you open the app is to check the status light. If you don’t pay attention, it’s really easy to overwrite your data and risk losing it! So you absolutely have to understand this one.

- Green light
means all your data is fully synced at this point, and you’re free to use Heptabase however you like.

- Gray light
means you’re currently offline. This usually shows up whenever you don’t have an internet connection!

- Yellow light — Syncing…
This shows up when you’re uploading data into Heptabase. Remember to wait for the yellow light to turn green before you start using the app.

- Yellow light — Connecting… Connecting
When you switch from offline back to online, Heptabase needs a moment to reconnect. Same deal — please wait for it to turn green before you start using the app.

- Blue light — Syncing…
Just like the yellow light, it’s syncing. At this point, remember to ease off and let the system run for a bit — wait for green before you start working!
There’s one more state, the red light (sync error or failure), but personally I’ve never run into it at all! And I hope you never do XD — my advice is to still use Heptabase while connected, so you don’t run the risk of losing data.
#27 Deep research with open in new tab
Personally, I really rely on the whiteboard’s visual layout for brainstorming projects or doing deep research, but a lot of people are hierarchical thinkers — and for them, the open in new tab feature is perfect for a top-down thinking mode.
- Visual thinkers: open a whiteboard on the left, open a card or file in the right sidebar
- Hierarchical thinkers: open a single card on the left, open a card or file on the right
Step 1
Drag-select the cards you want for your deep research — grab several at once
Step 2
Click the three-dot icon in the top-left (or right-click) to bring up the menu, then press Open in new tab
Step 3
and you’ll see: left = one expanded card, right = all the other cards you selected
A lot of people use this approach for writing brainstorms — putting all their reference material on the right and using the left side to create.
#28 Viewing whiteboards arranged hierarchically
Hover your mouse over Map in the left sidebar and you’ll see your whiteboards laid out hierarchically. You can see that inside my “Creator Operations” whiteboard, there are several more whiteboards on this same topic.
In the list, press the > icon and you can also expand and collapse these whiteboards.

Handy mouse tricks
Here I’ll share with my fellow Guts the mouse tricks that a surprising number of people don’t know about — genuinely so useful, so keep reading!
#29 View the whole whiteboard in one click
This is the feature I use most often. I keep it in the mouse section rather than the shortcut section because, personally, I just prefer pressing it this way — it feels so intuitive! It’s pretty similar to how other design apps work.
Click the percentage and the whole whiteboard automatically resizes to fit, so you never have to stress about what to do when a whiteboard has too much data on it! Once you’ve seen the whole whiteboard at a glance, you can zoom back in to check out specific data.

#30 Open Google search
Turns out Heptabase actually links up with Google search? It’s a pretty fun little feature, but honestly I rarely use it, because I’m more used to hitting a shortcut to search inside the ARC browser~
Step 1&2
Drag-select the text you want to search “anywhere,” press right-click, and choose Search with Google
Step 3
and it’ll automatically open up a Google search for the text you just selected
#31 Select text & select paragraphs
This one’s fun too — a little trick I stumbled onto by accident, and it’s really handy!

- Double-click on text = select a word
The system automatically tells whether it’s an idiom or a single word

- Triple-click on text = select a paragraph
The system automatically highlights all the text in that paragraph
Template
So many people ask me how I use the template feature, and yes, I’ve worked out my own little system for it. But this article already has more than enough info packed in XD, so for now let me just give you a quick walkthrough of how to use it!
#32 Pull up the template list
There are two places to pull up the template list: the first is from the left sidebar, the second is from inside a card.

- Pull up the template list from the left sidebar
Click the Heptabase on the left sidebar, then click Template, and the template list will appear

- Pull up the template list from inside a card
Inside a card, type the string “/template”, then click Template, and the template list will appear

#33 Create your own template
You can design your own templates, turning all your most-used formats into templates so you don’t have to copy-paste them over and over again later. Here I’ll use a multiple-choice format as the example.
Step 1-3
Select the content you want to turn into a template, click the six dots at the top-left of the content, then click Create template
Step 4
The system will ask you to name this template; once you’ve typed it in, press Save
Step 5
You’ll see a “Template added” notification pop up at the top of Heptabase, meaning it was successfully added to your template list
Step 6
Now open the template list and you’ll find a brand-new “Multiple Choice” template you just created, sitting right at the top
#34 Slash / to call up your own template
Once you’ve learned how to create one, how do you actually pull it up? Picking up from above, I’ll use the “Multiple Choice template” I just made to walk you through it.
Step 1
Inside a card or a text box, type “/ (the template name you chose)”Here I’m using the multiple-choice one as my example, so I type “/Multiple Choice”. But here’s the thing — while you’re still typing, you’ll notice that just typing “/Mult” already brings up the multiple-choice whiteboard option!

Step 2
Up comes the original content you selected to turn into a template, ready to use right away
《有效輸入 ∞ 快速輸出》用 Heptabase+ ChatGPT AI 實現下班後的創作夢!
目前已經超過 215 位學生購買課程、學生回饋都在寫小作文、各種五⭐好評!課內贈品已經超越課程價值,還直接分享當創作者的 SOP 流程,原創課程,外面絕對學不到唷!!
Styling
#35 Beautify your whiteboard with images
This feature is honestly perfect for the girlies (lol wait, aren’t you all my readers, when did you become girlies 🤣). Anyway, it’s great for women who want to treat their notes like a decorated journal.
It’s super simple — just drag a background-removed image from your computer onto the whiteboard, or copy a background-removed image from the web and paste it onto the whiteboard!


This feature is genuinely so handy — on my joke whiteboard I’ll place a bunch of smiley faces, so I can see which joke gets the most laughs out of people XDDD sorry, I really am a weirdo~ haha.
🎁 感謝你看到這裡!我準備了免費資源送你 ⬇
▲ 點圖領禮物 🎁 ▲
《7 天上手 Heptabase 工作坊!從 0 開始打造你的知識庫》
這是一堂我花了一整個月製作的「免費線上課程」。只要看完 7 天的工作坊並依照步驟完成作業,就能徹底改變你的筆記方式,建立你專屬的第二大腦!
我會手把手(影片+文字)每天帶你完成任務:
- ✅ Day 1 導航地圖
- ✅ Day 2 夢想板
- ✅ Day 3 靈感包
- ✅ Day 4 感恩日記
- ✅ Day 5 組織圖
- ✅ Day 6 閱讀筆記
- ✅ Day 7 AI 摘要
#36 Special syntax fonts with LaTeX
This is the LaTeX feature that Notion also has. I use Notion myself, so I figured I’d bring my Notion beautifying obsession over to Heptabase to test it out — turns out it actually works, hahaha!
I originally learned this feature from one of Chloe’s articles. You can click the image caption to read her piece — there are even more fancy syntax variations to copy! And below I’ll start sharing how to pull off the same effect in Heptabase.


Step 1&2
In a text box type “/Math block”, or you can select it with your mouse
Step 2
In the formula box, paste over the syntax for the effect you want, then just edit the text yourself
There are so many ways to display the syntax, but a word of advice, fellow Guts: don’t spend too much time on this feature. I once got sucked in and burned way too long on it — remember to get your actual work done XD!
#37 Build a clickable table of contents with images + text
This feature is often used for “index notes” in card-based note-taking — meaning a single view should have a table of contents, which makes it easier to guide people other than the creator to find things within the same whiteboard area.
Super simple! Just place an image directly behind the text box. Images usually layer themselves at the very bottom by default. Here I’m showing a table-of-contents text box ×1, three text boxes mentioning Cards ×3, and one text box mentioning a Section group ×1 (with an Icon on the left).

Sharing
#38 Share a whiteboard
Want to share all of your work or your thinking with someone else? You can use this feature to publish your whiteboard online! All you need to do is hand the other person a URL.
One thing to note here: because a whiteboard is incredibly vast, when you share it, you can set up the whiteboard’s zoom level and the positions of everything on it ahead of time. I’ll explain in detail below.
Share a URL & sync the latest whiteboard
Step 1&2
Click the Share at the top-right of the whiteboard, then turn on the Share to web toggle
Step 3
Your whiteboard info is now successfully published to a URLYou can copy the “public URL” and send it to friends or coworkers to view. The Share button at the top-right will also turn into a blue Shared, meaning this whiteboard is currently public!

There are two situations here you absolutely need to know about:
- If you tweak the content inside an already-published whiteboard, the content in the originally published whiteboard will NOT sync automatically!
- To sync the updates, you have to open Shared and hit Publish Changes — only then will the content sync to that public URL.
When you share, the whiteboard anchors to the top-left corner
When you share a whiteboard, if you don’t pay attention to its zoom level and the positions of your content, your readers won’t be able to find anything on the whiteboard. They might even feel the content is zoomed in or out too far, running into all sorts of “I have no idea where to even start looking at this public whiteboard” problems.
But the fix is actually really simple: whatever screen view you click the Share on at the top-right of the whiteboard, whoever opens the URL will see the exact same view, position, and zoom level as when you hit Share.
So before sharing, pay very close attention to your view’s size and position, so the layout doesn’t break when someone opens the whiteboard link. The entire view is determined by everything in the area to the “bottom-right” of the “top-left anchor point (the 🌭 in the image)” — think of it as the range of the “fourth quadrant” in a coordinate system.
- The hotdog you see after closing the left sidebar is the actual anchor point
- Below I’ll lay out the “computer screen before sharing” versus the “URL screen after sharing” side by side — please compare them left and right

On this whiteboard you can see that the text on the bottom “Test OOO” card is cut off! And the whiteboard zoom is at 114%.

You can see that the bottom “Test OOO” card is still cut off, and the zoom is still at 114%, unchanged.

This time I moved the entire whiteboard’s content to the right, added a vertical line of text on the left, and re-shared the URL.

You’ll find that when you open the URL, the new text really did get added on the left, and the anchor point and whiteboard are exactly the same — the view doesn’t jump off to some other part of the whiteboard.
This discovery was honestly earth-shattering. The moment I found it I immediately shared it with PJ, the Heptabase official support rep, and he said my discovery was awesome and hoped I’d share it with more people! (That’s also when I started collecting all these tips!!)
#39 Share a card
Some people are used to treating a single card like a Word document, writing entire bodies of content into it. In that case you can use these two sharing methods — exporting the card as “Markdown” or as “PDF” — to send it to someone.
First click the three dots at the top-right of the card, or press your right mouse button to bring up the menu, then click Export as Markdown to export as Markdown, or Export as PDF to export as PDF.

Markdown

Name this Markdown file

You’ll see a zip archive appear in your Downloads folder; once you unzip it, a .md file will show up

Name this PDF file

You’ll see a zip archive appear in your Downloads folder; once you unzip it, a PDF file will show up
Heads up here! Exporting as PDF is a brand-new feature that just launched in May 2024, so it’s quite likely to have a few bugs. If you run into any software issues, remember to report them to the team!
Other surprises
Here I’ll cover the surprise features I didn’t quite know how to categorize XD. Thank you so much for making it to the very last chapter — this is basically a whole book at this point, we’ve already passed 10,000 words… wild!
#40 Open two whiteboards at once
I kept asking the team for a feature to open two whiteboards side by side, or to open two tabs, but the team assessed that building this would just be too hard! It seems like it can’t be developed quickly, so I had to find my own workaround! After all, as a visual person, I know which whiteboard and which spot my data is hiding in, but I forget the actual names of things~ so I really do need a dual-view!
Pulling off the dual-view is simple: just open the “web version” and the “desktop version” — two different versions of Heptabase — at the same time, hahahahaha! Do anything on one side and the other version syncs the data at lightning speed. You can put them on two monitors and compare them left and right, though you can’t drag data between the two.

#41 The database feature
This is the most powerful database feature from Notion, that other note-taking app — and Heptabase has it too, and would you believe it’s tucked away inside Tags!! Pretty unique, right? Which is why some people can never find where it is.
Because I was building an online course for Heptabase, I went all over the place collecting all kinds of user questions, and the database lets me see everything at a glance. If you want to learn it, keep watching the tutorial below + how I use it!
Step 1&2
Click the Tag on the left sidebar, then hit + New Tag to create a new tag
Step 3
Click into the tag and you’ll discover the database featureIn the red box there are two different viewing modes: Table is the database view, and Kanban is the board-management view. I recommend you fellow Guts go play around with them yourself.

The team recently also rolled out a relation feature that lets you link two tags back and forth. I haven’t used this one yet, because when it comes to databases I still rely mostly on Notion. Any fellow Guts who’ve figured out clever uses, feel free to share them with me in the comments!
#42 Task dates
You can see the status of tasks on other dates — what needs to be done, what’s already finished — handy for time management!
Click the Journal on the left sidebar, click to open the right sidebar icon, then click the checkmark icon, and you’ll be able to see what’s on the to-do list for other days!

I personally rarely use this feature — my own time management runs on Notion, and I use both apps together, no all-in-one for me. But I figure a lot of people don’t know about this feature, so I’m sharing it too~
🎁 感謝你看到這裡!我準備了免費資源送你 ⬇
▲ 點圖領禮物 🎁 ▲
《7 天上手 Heptabase 工作坊!從 0 開始打造你的知識庫》
這是一堂我花了一整個月製作的「免費線上課程」。只要看完 7 天的工作坊並依照步驟完成作業,就能徹底改變你的筆記方式,建立你專屬的第二大腦!
我會手把手(影片+文字)每天帶你完成任務:
- ✅ Day 1 導航地圖
- ✅ Day 2 夢想板
- ✅ Day 3 靈感包
- ✅ Day 4 感恩日記
- ✅ Day 5 組織圖
- ✅ Day 6 閱讀筆記
- ✅ Day 7 AI 摘要
#43 Place images side by side
Inside a card you can’t put more than one image in the same row, so a lot of people have asked the Heptabase team whether they can develop this. But since the team still has plenty of more important features to build (this software is updated almost literally every day — they develop it so seriously), this feature, which already has a workaround, has been shelved for now.
The workaround I’m teaching here uses the “Table” feature!
Step 1
Type the string “/Table” to create a table
Step 2
On the left is how images line up without a table — only top-to-bottom; on the right, with a table, they can sit side by side
#44 Merge table cells
Heptabase’s table feature can’t do the very basic “merge cells” function found in spreadsheet apps, so the method I’m introducing today is also a workaround — just copy a table over from Excel and you can have merged cells!
Step 1
In Excel, create a table with merged cells, select it and press Ctrl+G to copy the table data
Step 2
In a text box or card, press Ctrl+V to paste the table data, and you’ll see the top row has been merged
That said, the team does warn that tables copied over from Excel may run into style-incompatibility issues, so unless it’s truly necessary, they don’t recommend using it this way at all — use your own judgment, fellow Guts.
#45 Switch between dark and light mode in two places
This feature is genuinely important — it protects your eyes! On my own computer I’m used to running every browser and app in dark mode. It’s just that if the Heptabase screenshots on my website all have black backgrounds, it looks too ugly XD — I can’t accept it — so I have to switch the mode to light, then change it back once I’ve finished writing the article.

- Click the gear icon on the left sidebar
- Click General
- You’ll see Light mode and Dark mode

- Click Heptabase on the left sidebar
- Click Dark mode or Light mode
- Toggle dark/light mode

Closing thoughts
This is my fourth article, and I’ve realized I really am a detail freak + long-form maniac — if I don’t teach even the simplest things in fine detail, I get itchy all over! And if my images don’t have a pretty colorful background + the KnowledgeGut Xiaochang smiley-face logo, I feel like I’ve left something undone (sorry XDD — I’m never this dedicated at a regular job, only when it’s my own business).
How many words and how long did this feature tutorial take?
A lot of people ask me exactly how much time this article cost me. Because many of these tips are things I keep an eye on all the time, when it comes to organizing them into a full article overview, the hours are already beyond counting.
But once I actually started writing, I made sure to time this article (project) — yes! I treated it like a project and timed it, hahahahaha. Total time spent topped “45 hours”, roughly “15,000 words”. This is practically book-writing territory, right?! Thank you for reading the article I poured my heart into.
And because I created this piece, I worked out my own article-production workflow — my next article was 3,000 words and only took me 1.5h! If I get the chance I’ll share my creative workflow with you~
Heptabase 訂閱費價格是多少?可以免費使用嗎?

Heptabase 目前是付費軟體
- 月繳:11.99 美金 / 月
- 年繳:8.99 美金 / 月
月繳費用:11.99 美金(一個月約 390 元台幣)
年繳費用:總共是 8.99 美金 * 12 個月 = 107.88 美金(一年約 3,300 元台幣)
有沒有促銷碼、折扣碼?
沒有折扣碼QQ 不過所有帳號都能夠免費使用 7 天,若你對這款筆記軟體非常有興趣想試用看看的話,可以點下面的按鈕試用 Heptabase,這樣也算請小腸喝一杯拿鐵,讓小腸更有動力努力產文、撰文,感謝觀看。
記得在註冊時,要用電腦版註冊(手機到付款頁面會卡住失敗),並且千萬不能離開這個按鈕點進去的網頁歐QQ,不然小腸就喝不到拿鐵惹 ..
哪個方案比較適合我?
◽ 你若只想試用看看,請選擇 「月費方案」
訂閱 Heptabase 會提供給新用戶 7 天免費的試用期,試用期之後,才會扣款一個月的訂閱費。
◽ 你若決定長期訂閱,請選擇 「年費方案」(小腸推薦🌭)
我會推薦的原因很簡單,一款筆記軟體用 1 個月幾乎是感覺不出來它的威力,我也是 2023/09 入坑就直接買一年試試看,用了三個月就變狂粉 + 合作推廣者,才開始有了你們所知的「知識包小腸」部落格發展出來。

也才有課程的經驗分享,一切都是因為我訂閱了年費方案,改變人生軌跡 😜
如果你喜歡我分享的內容,並想了解更多「知識管理」內容、報名每個月的【各有所腸】素人線上演講,請訂閱我的《腸篇大論》電子報!我會即時和你分享這些知識、並在開始新的 免費教學 時通知你 ↓
🌭 Welcome, Guts! 🌭

Finishing this piece felt like hitting some kind of life milestone, and it made me realize just how amazing and patient the folks who write feature articles and publish feature books really are! 15,000 words paired with several hundred images — that's no joke, hahahahaha. But it also let me know: OK, I can do this! Long-form, I've got it.
See that view-count tracker in the bottom left? I only set it up recently after “Drive Digital Marketing” introduced a traffic-analytics plugin called Independent Analytics, and I’m totally obsessed with it! Check out this article: Independent Analytics

小腸🌭(楊婷雅 / Phoebe Yang)
知識包小腸創辦人 | 兩岸 PKM 陪跑顧問
把你的知識變成「會複利的個人資產」——
鍛鍊第一大腦、打造第二大腦(Heptabase)、駕馭 AI 第三大腦。
專精卡片盒筆記法、自創記憶術筆記法、AI 自動化、AI 智能體系統。
已陪 2,000+ 位專業人士搭建個人知識庫。
📩「腸篇大論」電子報 · IG @knowledgegut · Threads @knowledgegut

如果對文章內容有任何問題,或者需要我補充說明的部分,歡迎在底下留言讓我知道唷~
文章有某些連結為「聯盟行銷」連接,如果點進去消費的話,小腸能夠從中獲得一點點點點點兒的佣金(不會影響價格)。
by 知識管理 大師姐 小腸🌭